
My beloved readers, I would like to ask you a favor. Since the begining of July the new passionandcooking has been online, unfortunately some of your emails got lost. Can you please check if you are still registered at Passion and Cooking ? Did you get a notification about my latest posts? If you did not get a notification, can you please subscribe again. Thank you so much. I do appreciate your collaboration. Paola
Spaghetti di Zucchine con Pesto e Pomodorini (Zucchini Spaghetti with Pesto and Cherry Tomatoes)
11 JulMy beloved readers you can read this post on the new Passion and Cooking. Please accept my apologies, we are still working on the new site. Paola
New Passionandcooking
4 JulMy Beloved Readers,
I would like to inform you that starting from July 3rd Passionandcooking has a fresh look, please check it out. Your feedback is very important. It is possible that this week you will not get a notification about the latest recipes published because we are still working on the subscribe section. Please accept my apologies. Paola
Sorbetto al Limone (Lemon Sorbet)
28 Jun
This is a perfect summer treat, refreshing and beautifully light. You can serve it either as a dessert or as a palate cleanser between meals. Sorbet traces back its origins from the Chinese in the VII A.C. The Greeks thought it was a nectar of the Gods, the Romans loved it, and still in the 21th century we are enjoying it!
Sorbet, also known in English as sherbet, is a frozen dessert prepared with sugar syrup flavored with any type of different fragrant fruit juices, fresh herbs (basil, mint for example), wine (champagne) and liqueur. The preparation is very easy and fast, the longer time is due to the freezing period. I would suggest to prepare it one day in advance and store it in the freezer. Sorbet should have a soft and smooth texture, so I add natural stabilizers to the recipe such carob seed flour and beaten egg white instead of chemicals and milk products like the mass production industry does. Carob seed flour is a natural thickening agent, rich with fibers, minerals and protein. Egg white is rich in protein too. They improve texture decreasing the freezing point.
Lemon sorbet is my favorite flavor, delicate and digestive. I love it as a dessert because it is something sweet to enjoy but at the same time light. I don’t feel guilty after eating it!
SORBETTO AL LIMONE (LEMON SORBET)
Preparation time: 50 min Cooling time: 8 hrs Servings: 10 people

INGREDIENTS
950 l (4 cups) water
650 g (3 cups+4 teaspoons) sugar
10 organic lemon, filtered lemon juice
2 organic lemon, zest
6 g (1 heaping teaspoon) carob seed flour
2 pasteurized egg whites, lightly whisked
10 organic lemons with thick rind, to prepare the shells
Lemon rind, shredded
DIRECTIONS
1. Cool a steel bowl in the freezer for 30 min.
2. In a saucepan combine 630 g (3 cups) sugar and water, bring to boil over medium heat. Cook for 5 minutes, stirring continuously, until sugar is dissolved and mixture starts to simmer. Add lemon zest. Remove from heat and cool completely. Filter out the zest from the sugar syrup
3. While syrup is cooling, prepare lemon shells. Cut off the top 1/3 of the lemon. Hollow out each lemon by using a grapefruit knife just inside the rind, circling the flesh. Remove juice and flesh with a spoon. If you have a fruit maker, you can use the pulp to prepare lemon juice. Make a slight shallow cut on the bottom of each lemon shells (being careful not to cut through to the inside of the lemon). This procedure will prevent it falling over when you serve it. Wrap shells in aluminium foil and store in the freezer. The frozen shell will prevent the sorbet from melting too quickly when you eat it
4. Mix 20 g (4 teaspoons) sugar and carob seed flour in a small bowl. Add ½ cup sugar syrup and mix with a whisk. Beat egg white in a separate bowl with an electric whisk
5. Pour the sugar syrup into the chilled bowl and stir in lemon juice and carob seed mixture. Add egg white and mix well. You can expect the egg white to separate somewhat from the lemon juice. That’s normal
6. For the final step, you can choose from two different methods: ice cream maker or freezer method. Ice cream method: Pour the mixture into ice cream maker and follow the instructions. Freezer method: Pour the mixture in a suitable container and store in the freezer for one hour. Remove and mix with a fork. Put in the freezer for at least three hours. Remove from the freezer, stir and put back in the freezer for another three- four hours. At this point, the sorbet should be ready. To give the sorbet a creamier texture, pop it in a blender for just a few seconds and then fill the lemon shells and freeze again for about 20 minutes. Decorate with shredded lemon rind. You can also let it thaw a little bit and serve in a flute with a straw.
Note: You can store the sorbet in the freezer for 3-4 days. -Paola
Strudel di Verdure (Vegetable Strudel)
24 Jun
When we think about strudel, we usually imagine the delicious pastry roll filled with apples, raisins and cinnamon, which is a traditional dessert of Trentino Alto Adige. The term derives from the German word “strudel” which means vortex; in fact, this stuffed roll, made with a very thin dough, is typical of the Italian regions that were part of the Austro-Hungarian Empire. The version that I propose here uses a different filling: fresh seasonal vegetables, sautéed in olive oil and flavored with fresh mint. A touch of robiola (anItalian soft-ripened cheese of the Stracchino family, (see focaccia di Recco) gives a creamy taste to this recipe. This tasty strudel is ideal as an appetizer or light vegetarian lunch. The preparation is quick and simple, and I recommend using puff pastry to speed things up. The traditional strudel dough is made of flour, oil and water and is pulled very thin, until it’s almost transparent; this is the secret and also the hardest part! You can also prepare the strudel in advance and then heat it in the oven a few minutes before slicing and serving.
STRUDEL DI VERDURE (VEGETABLE STRUDEL)
Preparation time: 50 min. Servings: 6

INGREDIENTS
1 medium red onion
200 g (7 oz) zucchini, cut into julienne strips
200 peppers (7 oz), cut into julienne strips
200 g carrots (7 oz), peeled and cut into julienne strips
3 mint leaves, chopped
5 tablespoons of olive oil (extra virgin)
100 g (4 oz) robiola, soft cheese
3 tablespoons grated Parmesan cheese
Salt and freshly ground pepper
230 g (8 oz) puff pastry (disc)
1 beaten egg
DIRECTIONS
Preheat oven to 180 ° C
1. In a pan sauté onion over medium-low, just until soft. Add carrots and peppers. After a few minutes (about 5) add zucchini, and salt and pepper to taste. Cook for about 5-7 min., Vegetables should be crunchy. Add mint. When done, drain the vegetables on paper towels to remove excess olive oil
2. Place the puff pastry disc on parchment paper. Spread with vegetable filling, leaving a border of about 5 cm (2 inches). Distribute pieces of the robiola cheese on top and sprinkle with Parmesan cheese
3. Roll up the strudel and close the ends to seal in the stuffing. Brush with egg and bake on a baking sheet covered with parchment paper for about 35-40 min. Remove from oven and let stand on a rack for a few minutes. Serve warm. Paola
Peperonata
14 Jun
A simple and Mediterranean recipe but definitely enjoyed all over the world.
Peperonata (Pay-pay-row-NAH-ta) is a summer dish, since peppers are in season from June to September. Fruit and vegetables are definitely more tasty and full of flavor when they are in season. In summer I really like doing my vegetable shopping at the market, all stands are overflowing with bright colors and fresh fragrance. Peperonata is a simple dish made with bell peppers, onions, garlic and tomatoes, but it is very versatile; we can enjoy it as a side dish with meat (I love it with meatballs!), with fish such as cod, as an appetizer with toasted bread, or as a first course on pasta. I leave the choice to you! If you prefer a richer recipe, you can add some diced potatoes to the peppers. Instead, the Sicilian recipe adds toasted (in olive oil and garlic) bread crumbs before serving.
Another delicious summer recipe to enjoy with these vegetables is grilled pepper, a tasty appetizer or a side dish. Do not forget that peppers are very rich in water, about 90%, therefore they are an excellence choice for your summer diet.
PEPERONATA
Preparation time: 55 min. Cooking time: 50 min. Servings: 6

INGREDIENTS
1.2 kg bell peppers of different colors, cut into 1.5 cm strips
350 g Tropea onions (red onions) peeled and thinly sliced
garlic cloves
400 g peeled plum tomatoes cut into small cubes
6 tablespoons of olive oil (extra-virgin)
1 teaspoon sugar
1 teaspoon of dried chili pepper (optional)
Ground black pepper
Salt
DIRECTIONS
1. Peel the onions, wash and cut into thin slices.
2. In a pan heat the oil olive over medium heat, add onions and garlic. Sauté over medium-low heat for about 15 min. turning a few times with a wooden spoon until onion is soft and translucent.
3. Wash the peppers under running water. Remove the stalk, cut in half, then remove seeds and filaments. Cut the peppers into strips (1.5 cm, about 1/2 inch thick). Combine with the onion and garlic. Cook covered over medium-low for 15 min. Remove the lid, add the tomatoes, chilli pepper (optional), salt, pepper and sugar. Mix well and cook for about 15 min. until peppers are tender.
Note: I suggest to buy bell peppers of medium size, firm and meaty. The onions that I use are the red onions of Tropea (a city of Calabria), they have a delicate and sweet flavor. Paola
Bruschetta al Pomodoro (Tomato Bruschetta)
8 Jun
Bruschetta (broo-SKAY-tah) is a perfect appetizer to serve with an aperitif; it’s fast and easy to prepare. The ingredients are simple: bread, tomatoes, olive oil (extra-virgin of course), basil and garlic, but the result is wonderfully flavorful. The type of bread that I use is homemade bread from Puglia or Tuscany. The quality of tomatoes is very important; they should be mature, sweet and full of flavor. They should also have a thin skin, because they should not be peeled. Bruschetta is a native of Rome, where “bruscare” means simply “to toast” in the Roman dialect. Originally a simpler version existed: only bread and olive oil. Today it is also a typical dish all over central Italy – Umbria , Tuscany and Abruzzo – and is prepared using tomato, too. I personally prefer this version; I find it more tasty and inviting, perfect for a summer cook out.
BRUSCHETTA AL POMODORO (TOMATO BRUSCHETTA)
Preparation time: 10 min. Servings: 6 people  INGREDIENTS
12 slices crusty bread
8 ripe tomatoes
18 basil leaves
4 garlic cloves
Salt
Extra-virgin olive oil
DIRECTIONS
1. Wash the tomatoes and dice them into small pieces. Place in a bowl and season with a pinch of salt, 5-6 basil leaves and a clove of garlic cut in half. Allow to stand for 10 min. Remove the liquid and drizzle with some olive oil
2. Slice the bread ( 15x5cm, 6x2inch thickness 2.5 cm, 1 inch). Toast it on the grill or under the broiler. Rub with a clove of garlic cut in half and cover with the tomato mixture. Garnish with a basil leaf and serve warm. Paola
Torta di Riso (Rice Cake)
31 May
A light and delicious cake, perfect for a gluten-free diet.
The rice cake is an Italian classic, prepared with some variations in the different regions of Italy The recipe that I am proposing is typical of Emilia Romagna; in the past it used to be prepared only at Easter, but nowadays we eat it all year long. It is too tasty for just one occasion! Actually I like it as a summer dessert because of its fresh lemon taste. The simple recipe with milk and rice can feature a variety of different other ingredients, according to your personal tastes (see note). The rice I use is the Arborio or Carnaroli rice, rich in starch, that gives a smooth texture to this dessert. The traditional recipe calls for some butter (about 3 tablespoons); I omit it to make the recipe lighter. You can serve it as a dessert after dinner, or I also like it as an afternoon snack with a good cup of coffee.
TORTA DI RISO (RICE CAKE)
Preparation time: 1 hour Cooking time: 45 min. Servings: 6

INGREDIENTS
950 ml (4 cups) whole milk
200 g (7 oz) Arborio rice
1 vanilla bean
70 g (½ cup) blanched almonds, coarsely chopped
100 g (2/3 cup) raisins
1 lemon, grated rind
130 g (1/3 cup) sugar
3 medium eggs
1 pinch of salt
Rum
Powdered sugar for decoration
DIRECTIONS
Preheat oven to 160 °C.
1. In a small bowl soften the raisins in the rum for about 10-15 min. The amount of rum should be enough to fully cover the raisins
2. Bring the milk to a boil with the vanilla bean. Then remove the vanilla and add the rice. Cook over medium-low heat for 30 minutes or more, until the mixture is similar to a “risotto” (pretty dense mixture). Stir often with a wooden spoon. Pour the mixture into a glass bowl and allow to cool
3. As soon as the “risotto ” is cold, add the raisins and rum, almonds, salt and lemon zest
4. In a bowl beat the eggs with the sugar using an electric mixer until creamy. Add the rice mixture and stir. The batter should be pretty liquid
5. Coat the bottom of a spring form pan (diameter 18 cm, 7 inch) with a disc of baking paper and pour in the mixture. Bake for about 45 minutes, until the surface is golden and a knife inserted in the middle comes out clean. Allow to cool on a rack. As soon as the cake is cool, loosen the cake from the pan by running the blade of a knife around the edges, and then release it. Remove the baking paper. Place on a serving plate and enjoy!
Note: The almonds can be replaced with an equal amount of pine nuts. You can also add 50 g of dried apricots, cut into small pieces. Vanilla can be replaced with a pinch of ground cinnamon. Some recipes use fresh fruit such as pitted cherries. Paola
Farinata di Ceci (Chickpea Flatbread)
23 May
I love chickpeas and everything made with these tasty legumes. They have a delicious, slightly nutty flavor that goes well with many dishes. In addition they are very nutritious because they contain a lot of protein, minerals and vitamins (see chickpea salad). Farinata (Fah-ree-NAH-tah) is a tasty flatbread made with chickpea flour, and it is typical of Liguria, particularly from Genoa. It has a long history; it is thought to date back to the Greeks and Romans, when soldiers prepared it for their meals as a substitute for bread. The traditional recipe uses only four ingredients: chickpea flour, olive oil, water, salt. I like to enrich it with ground pepper and chopped rosemary leaves, a flavorful note to this delicate and delicious recipe. The preparation is very easy: just mix the flour and water. Instead, the “hard-work” is waiting the 12 hours needed to allow the chickpea flour to absorb the water. This delectable dish can be served as an appetizer or a snack, and it’s a healthy alternative to offer to our kids. In the past it was a common afternoon snack after school: tasty and good for you. If you want to prepare a gluten-free meal, this recipe will be a hit. A personal recommendation: eat it warm . If there is any leftover (which I doubt!), heat it for a few minutes in a hot oven.
FARINATA DI CECI (CHICKPEA FLATBREAD)
Preparation time: 10 min. (plus 12 hours) Cooking time: 35 min. Servings: 8

INGREDIENTS
330 g (12 oz) chickpea flour
950 ml (4 cup) water at room temperature
80 ml (1/3 cup) olive oil (extra-virgin)
Leaves of 1 sprig of rosemary, chopped
Salt
Freshly ground pepper
DIRECTIONS
1. In a bowl, dissolve flour in the water, stirring with a whisk and making sure that there are no lumps, until mixture is liquid and homogeneous. Let it stand covered with a lid for 12 hours at room temperature
2. Preheat oven to 220° C (425 °F)
3. After 12 hours, if there is some foam on the surface, remove it with a spoon. Add salt, pepper, rosemary and half of the oil. Stir
3. Pour the other half of oil in a 32 cm (13 inch) diameter metal pan. Pour in the batter and bake for about 35 minutes until the surface is golden brown. Serve warm. Paola
Bucatini all’Amatriciana (Amatriciana Pasta)
16 May
This is a tasty, simple and fast recipe that you can make anytime you crave for a spicy pasta dish.
The amatriciana (ahm-mah-tree-CHA-na) is mouthwatering sauce for pasta, made with bacon, tomato and Pecorino cheese. Everything is seasoned with chili pepper.
The name of this delicious recipe comes from Amatrice, a town at the center of the Apennines ( in the province of Rieti), where on the last weekend of August, a large quantity of this tasty dish is prepared for the local festival. The recipe has a tradition that dates back to when the shepherds were the primary inhabitants and Amatrice was still part of Abruzzo and spaghetti was used instead of bucatini. This recipe was then acquired by the Romans who replaced spaghetti with bucatini, common to their culinary tradition, added onion.
The bucatini is a type of long pasta, very similar to large hollow spaghetti. This delectable dish goes extremely well with a glass of your favorite red wine.
BUCATINI ALL’AMATRICIANA (AMATRICIANA PASTA)
Preparation time: 20 min. Servings: 4

INGREDIENTS
340 g (12 oz) bucatini
1 tablespoon olive oil (extra-virgin)
100 g (¾ cup) diced bacon or pancetta
1 medium onion, finely chopped
60 ml (¼ cup) dry white wine
340 g (12 oz) San Marzano tomato sauce
1 teaspoon dried chilli pepper
Salt and freshly ground pepper
4 tablespoons grated Pecorino cheese
DIRECTIONS
1. In a sauce pan heat oil over medium heat, add bacon and fry until fat has melted and bacon is crisp. Stir frequently
2. Add onion and saute for about 7-8 minutes. Add chilli pepper, cook for a minute and then add the wine. Increase heat to evaporate half of the wine. Add tomato and cook for additional 10 min.
3. Meanwhile bring to a boil 3 liters of salted water, add bucatini and cook until al dente for approx. 10 min. (according to the instructions on the pasta package). Drain and pour into a warm serving dish, drizzle with the sauce, season with Pecorino cheese! Paola
Rotolo di Tacchino e Asparagi (Asparagus Turkey Roll)
9 May
A spring recipe, spectacular but easy to prepare.
This turkey roll,filled with an asparagus omelette is a tasty main course for a fancy dinner or for a Sunday lunch with family, as we usually eat it in Italy. Impress your mother with it on Mother’s Day this Sunday! The recipe is simple and does not requires particular culinary skill, but the result is quite spectacular, and it is definitely an impressive dish. The roll is made with turkey breast, enriched with an appetizing asparagus omelette (for more information about this tasty and healthy spring vegetable spring see tortino di asparagi e salmone affumicato)
You can cook your roll directly in the oven (at 180 °C, 350°F) for about an hour, until a meat thermometer reads 75 °C- 167°F or on the stove in a rosting pan, and then in the oven for just a few minutes. I prefer this second method because the meat remains tender but not dry. Since the turkey is lean meat with no cholesterol, if it is not cooked properly can be stringy and dry. In my opinion the stove top method enhances the flavor and quality.
ROTOLO DI TACCHINO E ASPARAGI (ASPARAGUS TURKEY ROLL)
Preparation time: 1 ½ hours Servings: 6

INGREDIENTS
850 g (30 oz) lean turkey breast
250 g (about ½ pound) fresh asparagus, cleaned (450 g, 1 pound uncleaned)
7 tablespoons of olive oil (Extra Virgin )
1 sprig of fresh rosemary
1 shallot, thinly sliced
4 eggs
2 tablespoons grated Parmesan cheese
240 ml (1 cup) dry white wine
Vegetable broth (optional)
Salt and freshly ground pepper
Kitchen twine
DIRECTIONS
1. Clean the asparagus (as suggested in tortino di asparagi e salmone affumicato ). Cut into small pieces of about 1 cm (½ inch) length, keeping the head whole
2. In a pan sauté shallot at medium low heat until soft (4-5 minutes), add the asparagus, stir and cook over medium heat for about 5 min. Set aside.
3 . In a bowl beat the eggs, add Parmesan cheese and a pinch of pepper. Mix and add the asparagus. Heat a tablespoon of olive oil in a non-stick pan. Cook over medium heat, turning the frittata (omelette) once.
4 . Ground the turkey breast to a thickness of 1.5 cm (½ inch), place the frittata in the center of the meat, leaving 1 cm (½ inch) space around the entire perimeter. Roll it and secure with a kitchen string every 5 cm (2 inch).
5. Brown the roll in a roasting pan on all sides using 3 tablespoons of olive oil, add rosemary. Season with salt and pepper. Add wine and cover with a lid. Cook for approx. 1 hour on medium heat, turning 2-3 times. If the wine dries up, add some vegetable broth
6. Preheat oven to 205 °C – 400 °F
7. Place the roast on a baking sheet, bake and cook for approx. 5 min. The roast should be golden on all sides .
8 . Remove from the oven and allow to cool for 10-15 min. Cut the twine, slice and serve with salad or honey caramelized carrots. Paola
Mascarpone Fatto in Casa (Homemade Mascarpone Cheese)
2 May
I bet that you have tried tiramisù at least once in an Italian restaurant, that creamy Italian dessert made with a magic ingredient: mascarpone cheese. Today I will share a little secret with you: how to make mascarpone at home! Making cheese can certainly seem difficult, but preparing mascarpone is very easy -it only requires ten minutes of your time and just two ingredients: cream and freshly-squeezed lemon juice. What you really need is patience for the cooling time in the refrigerator, that’s it. The smooth texture and the mouthwatering taste of fresh homemade mascarpone can’t be compared to one you buy, and I doubt you will ever buy it again. In Italy we use mascarpone for both savory recipes (for example, datteri ripieni con mascarpone e noci), as well as pies and sweet recipes (panettone con crema al mascarpone, pandoro alla crema di limoncello). Mascarpone originated in my region of Lombardy, probably in the 16th or early 17th century. Nowadays it is recognized as a prodotto agroalimentare tradizionale (tradtional food product).
MASCARPONE FATTO IN CASA (HOMEMADE MASCARPONE CHEESE)
Preparation time: 9 hrs Yield: 300 g (1 ½ cups, or 11 oz)

INGREDIENTS
500 ml (2 cups) cream (not ultra-pasteurized)
7.5 ml (½ tablespoon) freshly-squeezed lemon juice
DIRECTIONS
1. In a medium saucepan, heat cream on a medium low flame, stirring constantly with a whisk until it reaches the temperature of 85°C (185°F)
2. Very slowly add the lemon juice stir and continue to cook until the cream thickens to coat the back of a spoon (about 8-10 min). Remove from the heat and let it cool at room temperature for about 35 min.
3. Line a colander with a cheese cloth and place it on top of a bowl. Pour in the cream, scraping the pan with a spatula, and let it cool completely
4. Cover with plastic wrap and let it rest in the fridge for at least 7-8 hours. If I have to use mascarpone for my tiramisù, I usually check it after 7 hrs because I prefer it very creamy. The texture of tiramisù is smooth. The more you live it the fridge the more dense it becomes
5. Transfer mascarpone to an airtight container. It can be stored in the fridge for about 3-4 days. Mascarpone is good fresh.
Note: The refrigeration temperature and time are critical. It should be 4°C (39°F), and the longer you leave it in the fridge the thicker it becomes. The mascarpone consistency is like the Philadelphia cheese. The quantity of lemon juice is usually 7.5 ml (½ tablespoon) per 500 ml (2 cups) of cream, but the quantity of citric acid in each lemon can vary a little bit. If the cream does not start to thicken after 5-7 min. of cooking, you can add a few more drops of lemon juice. Paola
Pasta con i “Broccoli” (Pasta with “Broccoli”) – Vrocculi Arriminata
27 Apr
This tasty primo piatto (first course) is typical of Sicily, but it’s not uncommon to find variations in the ingredients if you eat it in another province. Perhaps it is better known by its name in Sicilian dialect pasta with vrocculi arriminata, which translated into Italian means pasta with broccoli in the pan. I should specify that in Palermo they call broccoli what, in other parts of Italy, we call cauliflower. This appetizing pasta recipe is prepared with cauliflower sweetened with onion, raisins and pine nuts, and colored with the king of spices, saffron (see pasta with saffron ). The type of pasta which I commonly use is bucatini, because it goes well with this type of sauce.Bucatini is a thick, hollow, spaghetti–like pasta. Anyway, spaghetti is a good substitute for this recipe, in case you cannot find bucatini. The taste of this dish, savory and sweet, reminds me of the Arabic traditions. In fact, Sicilian cuisine was strongly influenced by the Arab domination and shares close historical, cultural and “flavorful” ties to it.
PASTA CON I “BROCCOLI” (PASTA WITH “BROCCOLI”) – VROCCULI ARRIMINATA
Preparation time: 25 min. Cooking time : 10 min. Servings: 4

INGREDIENTS
340 g (12 oz) bucatini
1 medium cauliflower
3 tablespoons olive oil (extra-virgin)
1 onion, finely chopped
2 garlic cloves
2 anchovy fillets in oil, finely chopped
80 g (½ cup) toasted pine nuts
80 g (½ cup) raisins
4-5 saffron threads
Salt and pepper
DIRECTIONS
1. Trim the tops of the cauliflower. Wash under running water and cook for 6-8 minutes until al dente. Drain with a slotted spoon. Set aside and keep the cooking water for the pasta
2 . In a pan heat the oil and fry the onion and garlic at medium-low heat for a few minutes. Be careful not to burn them. Add the anchovies , raisins , toasted pine nuts and the cauliflower. Dissolve the saffron in 50 ml of water in which you cooked the cauliflower and add it to the sauce. Mix (arrimina) with a wooden spoon and cook for 5 minutes. Remove garlic cloves. Season with salt and pepper.
3 . Meanwhile, cook the pasta in the cooking of cauliflower you get salty. Cook the pasta al dente for about 10 minutes (follow the cooking time indicated on the package ). Strain and pour into the pan with the sauce. Stir and serve hot .
Note: To give an extra of sweetness, add the ” muddica atturrata ” prepared as follows: in a nonstick frying pan toast 4 tablespoons of bread crumbs over medium heat. When it is well colored remove from heat and add a tablespoon of extra virgin olive oil. When oil is well absorbed, add a tablespoon of granulated sugar and serve over the pasta. Paola
Pollo con i Peperoni (Chicken with Peppers)
21 Apr
This recipe is simple, but it teases your palate with its rich flavor.
Chicken with peppers, better known as chicken of ” Sora Lella ,” is a tasty main course (watch this interesting video https://www.youtube.com/watch?v=YMRY2DFWBos). It takes its name from the renowned sister of the famous Italian actor Aldo Fabrizi (1905-1990). She used to prepare this recipe in her trattoria in Rome. It’s a tasty Roman dish that you can enjoy with mashed potatoes, polenta or basmati rice. The combination of peppers and the delicate chicken meat creates a truly inviting dish. The addition of chilli pepper gives a special bite to this recipe. The amount of chili is purely personal, if you want a really spicy dish you can add two chilli peppers. The chilli pepper adds flavor, and it is beneficial to your health (see also spaghetti alla puttanesca). You should not forget that it increases your metabolism and is therefore a good ally to help you lose weight!
Like many recipes, this one has a lot of variations. You can either add onions to the chicken or omit the tomatoes. The recipe that I am presenting is the one I like the most.
Peppers are very versatile vegetables, I enjoy them prepared in different ways. I would also suggest trying grilled peppers, a tasty appetizer or side dish .
POLLO CON I PEPERONI (CHICKEN WITH PEPPERS)
Preparation time: 1 ½ hours Servings : 4

INGREDIENTS
1.2-1.4 kg (about three pounds) chicken, cut into pieces
6 tablespoons of olive oil (extra virgin)
1 sprig of fresh rosemary
1 hot chili pepper
240 ml (1 cup) dry white wine
400 g (14 oz) canned tomatoes (San Marzano)
1 clove of garlic
4 average-sized peppers of different colors
1 teaspoon sugar
Salt and freshly ground black pepper
DIRECTIONS
1. Clean, wash and pat dry chicken
2. In a skillet, heat 3 tablespoons of olive oil, saute the chicken on medium heat for about 10-15 minutes until chicken is golden brown on both sides
3. Add rosemary and chilli pepper. Season with salt and freshly ground pepper. Add the white wine and cook for about 25-30 minutes with the lid. The meat should be tender
5. While the chicken is cooking, prepare peppers. Wash, cut in half, remove the seeds and white filaments. Cut into pieces of approx. cm 3 (1.5 inch) width. In a non-stick frying pan over medium-low heat, saute – but don’t burn! – a garlic clove in 3 tablespoons of oil. Add peppers, raise the heat to medium and cook for 5 minutes, stirring frequently. Add tomatoes, sugar and salt, and cook with the lid on for approx. 15 minutes until the peppers are soft
6. When chicken is done, add peppers to the chicken, stir and serve warm. – Paola
Pizza Rustica (Rustic Pizza)
17 Apr
This pizza is a little bit a different from what you imagine about pizza, but it’s still delicious! Pizza rustica is a typical recipe for Easter, especially for the Easter Monday picnic, Pasquetta, but I prepare it as an aperitif or appetizer for a casual dinner with friends throughout the year too. To tell the truth it is not a real pizza but a pie with a buttery crust, filled with eggs, ricotta cheese, mozzarella, Parmesan and spicy pepperoni, a very appetizing mix. Ricotta is a fresh cheese with a delicate flavor that blends perfectly with the peperoni. There are several variations of pizza rustica with different crusts depending on the region where it is prepared. Some people use a yeast dough as a crust, others add different types of cheese. This recipe is the one I love the most, one that my children especially enjoy.
PIZZA RUSTICA (RUSTIC PIZZA)
Preparation time: 60 min . Cooking time: 40 min. Servings: 6

INGREDIENTS
Pie dough
350 g (2 ¼ cups ) flour 00
5 g (1 teaspoon) salt
5 (1 teaspoon) sugar
5 g (1 teaspoon) baking powder for pizza or focaccia
170 g (6 oz) butter, cold, cut into pieces
70 ml (heaping ¼ cup) cold water
Filling
350 g (12.5 oz) ricotta cheese
3 eggs
75 g (¾ cups) grated Parmesan cheese
250 g (9 oz) mozzarella cheese (see note below), cut into cubes
100 g (3.6 oz) pepperoni
salt and pepper
DIRECTIONS
1. For the pie dough. In a large bowl mix the dry ingredients (flour, salt, sugar and baking powder). Add butter and work with a pie cutter until the mixture is sandy. Add water, working first with a spoon and then with floured hands to form a ball. Wrap in cling film and leave in the fridge for about 20 minutes.
2. Prepare the filling. In a medium bowl mix the ricotta with a fork and then add the eggs. Beat with a spoon to obtain a creamy mixture. Stir in the Parmesan cheese, mozzarella and pepperoni. Add salt and pepper to taste
3. Preheat oven to 180 ° C
4. Remove the dough from the fridge. Spread 2/3 of dough with a rolling pin on a floured surface with 2-3 mm thickness. Transfer the dough into a ceramic pan (25 cm, 10 inch) in diameter, puncture the bottom with the tines of a fork, pour in the filling and level. Roll out the remaining third of the dough. Cut into 6 mm wide strips with a knife and form a latticework over the filling
5. Bake for 40 minutes or until golden brown. Remove from oven and let it cool on a rack for about 20 minutes. Serve warm or at room temperature.
Note: I would suggest using a pizza mozzarella because fresh mozzarella has too much liquid in it. If you can’t find it, Caciocavallo cheese and Provolone cheese are good substitutes for pizza mozzarella. Paola
Quote

Mini Cassata Siciliana (Mini Sicilian Cassata)
13 Apr
This year I will celebrate Easter with cassata, a delicious, tempting and colorful cake. Cassata is a typical dessert of the Sicilian pastry, in particular of Palermo. In the past it was enjoyed exclusively to celebrate Easter after the long period of Lent: a well-deserved award! Today it is enjoyed throughout the year.
The preparation is not particularly difficult as far as the cake it is concerned, whereas the decoration can be sumptuous and baroque, requiring some ability. The version that I propose is quite easy, also good for less experienced cooks. The ingredients are simple: ricotta cheese, dark chocolate and candied fruit. All these ingredients are mixed with sugar and used as a filling between two discs of sponge cake covered with colored marzipan and decorated to taste.
This recipe, like other Sicilian ones, was influenced by the Arabic domination. The name, in fact, derives from the Arabic “Quas’at”, which means round bowl. In fact, the shape looks like a bowl. The mini cassata is an alternative to cassata, elegant to serve and tasty to eat. Happy Easter all my beloved readers! Buona Pasqua a tutti!
MINI SICILIAN CASSATA
Preparation time: 2 hrs Servings: 6 people

INGREDIENTS
450 g (16 oz) sponge cake, sliced 1 cm (½ inch) thick and cut into 12 discs 8 cm (3 inch) diameter with a cookie cutter
600 g (21 oz) ricotta cheese
160 g (2 cups) powdered sugar
150 g (5 oz) dark chocolate, cut into small cubes
150 g (5 oz) candied fruit, cut into small cubes
28 g (1 oz) peeled pistachios, cut into pieces
White Marsala wine
450 g (16 oz) almond paste
Green food coloring
White icing
Candied fruits for decoration
DIRECTIONS
1. In a large bowl whisk sugar with ricotta. Add chocolate, candied fruits and pistachios
2. Line the base and the sides of 8 cm (3 inch) diameter and about 10 cm (4 inch) height bowl with parchment paper. This process will help remove the cassata from the bowl. Place a disc of sponge cake sprinkled with Marsala wine, pour in some of the filling (almost to the top) and cover with another disc of sponge cake sprinkled with Marsala. Cover the surface of the cake with some parchment paper and store in the fridge for about one and a half hours
3. Knead the almond paste on a working surface sprinkled with powdered sugar, mixing in the dye until you get the your favorite shade of Easter green. Roll out a disc of marzipan to cover the entire mini cassata, including the sides, to a thickness of 4-5 mm.
4. Take out from the the refrigerator, remove from the bowl and flip over onto a serving plate
5. Place almond paste on top to cover the entire surface. Decorate as desired. I decorated it very simply with some white icing and candied fruits. You can use your creativity to make it fancy.
Note: You can use this recipe to prepare just one cassata with a disc (25 cm, 10 inch) diameter. The amount of almond paste is 280 g (10 oz). Paola
Involtini di Prugne e Bacon (Prunes and Bacon Rolls)
6 Apr
This a fast and irresistible appetizer prepared with only two ingredients: prunes and bacon. Pitted prunes are wrapped with bacon and cooked in the oven until bacon becomes crispy and tasty. The combination of prunes and bacon is delicious: the sweet flavor of prunes mix well with the bacon’s salty taste. When the bacon fat melts during cooking, it lends a special touch of extra flavor to the prunes. When you start eating these appetizing bites, it is hard to stop…..uno tira l’altro!
INVOLTINI DI PRUGNE E BACON (PRUNE AND BACON ROLLS)
Preparation time: 10 min. Cooking time: 10 min Servings: 4

INGREDIENTS
8 thin slices of bacon
8 pitted prunes
8 toothpicks
DIRECTIONS
1. Preheat oven to 180 °C
2. Soak prunes for 8 min. in water. Remove and dry
3. Wrap each prune with a sheet of bacon (about 15 cm long and 2.5 cm wide ). Pierce a toothpick through center of prunes to hold bacon into place
4. Arrange the rolls on a baking sheet covered with a baking paper
5. Bake for 8-10 minutes, turning once, until bacon is crispy. Remove from oven and serve hot.
Note: You can substitute the prunes with almond-stuffed dates. -Paola
Insalata di Songino, Noci e Uva Sultanina (Songino, Nuts and Raisins Salad)
31 Mar
This colorful salad can be either a great side dish for a main course, although the addition of goat’s cheese makes this salad a perfect wholesome, standalone meal, too. I love it after exercising at the gym: it is light and nutritious. The color of nuts and raisins contrast with the bright green of the lettuce and add an exotic flavor to this dish. The dressing , sweet and spicy, is prepared with extra virgin olive oil, balsamic vinegar, honey and mustard. This mix of flavors goes very well with the taste of songino lettuce.
Songino also known as lamb’s lettuce, has a slight sweetish taste and numerous nutritional properties and health benefits. It is rich in vitamins (A, B and C ) and minerals (phosphorus , potassium, iron and magnesium). It also has diuretic and detox properties, so it is a great choice for cleaning out our bodies in preparation of the summer. Do not forget that nuts are very rich in vitamins (especially vitamin E), minerals and unsaturated fatty acids, therefore an healthy choice too!
INSALATA DI SONGINO, NOCI E UVA SULTANINA (SONGINO, NUTS AND RAISINS SALAD)
Preparation time : 10 min. Servings: 4

INGREDIENTS
150 g (5.3 oz) lettuce salad
4 tablespoons walnuts
3 tablespoons raisins
Dressing
3 tablespoons olive oil
1 tablespoon balsamic vinegar
1 teaspoon honey
1 teaspoon Dijon mustard
1 pinch of salt
DIRECTIONS
1. In a small bowl prepare the dressing by mixing oil, vinegar, honey , mustard and salt
2. Wash thoroughly and dry the lettuce . This type of salad retains dirt easily, so it must be washed several times. Set aside
3. In a large bowl toss the lettuce, walnuts and raisins (keeping aside a tablespoon of each of these ingredients for garnish) with the dressing. Serve immediately. You can garnish with goat cheese cut into small pieces.
Note: The type of nut is purely personal. I suggest pecans, typical American nuts. They have an intense and buttery flavor, they are my favorite. When you taste pecans, you’ll want to replace walnuts in your diet with them in the future, I guarantee! – Paola
Focaccia di Recco
23 Mar
Focaccia di Recco is a delicious snack that can be enjoyed any time during the day. When we think about focaccia, we usually think about bread dough with yeast; instead the peculiarity of the focaccia di Recco is the lack of yeast! For this reason it is also good for people who are intolerant to this ingredient.
It takes its name from the town of Recco in the Ligurian Riviera di Levante. The dough is very simple, made with flour, extra virgin olive oil, salt and water. The filling is stracchino or crescenza, a soft cow’s-milk cheese with a mild and delicate flavor. The name stracchino comes from the Italian word “stracca” meaning tired. This refers to the fact that the milk from the tired cows coming down in autumn from the alpine pastures, is richer in fat and it has a characteristic taste. The delicious combination of this dough and stracchino makes this preparation unique, a special treat for both adults and children. My kids love it for a quick lunch after school or for an afternoon snack. You can also serve it as a tasty appetizer with a glass of prosecco.
The history of focaccia di Recco is ancient and dates back to the third crusade. It was an affordable food when only simple ingredients were available. At the end of the 1800s it was added to the menu of the various local trattorie (rustic restaurant) as a special dish for the Day of the the Dead, celebrated on November 1st. Today it is enjoyed all year round and not just in Liguria!
FOCACCIA DI RECCO
Preparation time: 150 min . Cooking time : 10 min. Servings : 6 people

INGREDIENTS
320 g (2 cups) Mannitoba flour
200 ml (1 scarse cup) water, room temperature
8 g (1 heapping teaspoon) salt
45 ml (3 tablespoons) olive oil (Extra virgin)
500 g (19 oz) stracchino or crescenza cheese
DIRECTIONS
1. In a medium bowl combine water and oil, then dissolve salt
2. Place the flour in a large bowl, add the liquid. Start mixing with a fork incorporating the flour little by little, then mix with a wooden spoon until you obtain a smooth dough. Transfer to a floured work surface and knead (about 10 min.) with your hands until the mixture is uniform and elastic. Wrap in plastic paper and let it rest for about two hours at room temperature
3. Divide the dough into two equal parts and roll out with a rolling pin on a floured work surface trying to keep it as round as possible and pretty thin, about 1.5 cm. Now the hard part comes: you’ll have to pull the dough with your hands (floured) until it is almost transparent. It is important not to have holes in the dough, otherwise the cheese will come out when it bakes
4. Preheat oven to 230 °C (450 °F)
5. Grease a round baking pan (30 cm, 12 inch diameter) with olive oil and place a sheet of dough on it, cover with the cheese cut into pieces (not too small). Cover with the other sheet, sealing the edges well with your hands and pinching the surface 5 or 6 times. Brush the top with olive oil
6. Bake for 10-15 minutes until the surface is golden Serve hot. If there is any left which you can it heat it again in a hot oven for a few minutes. Paola
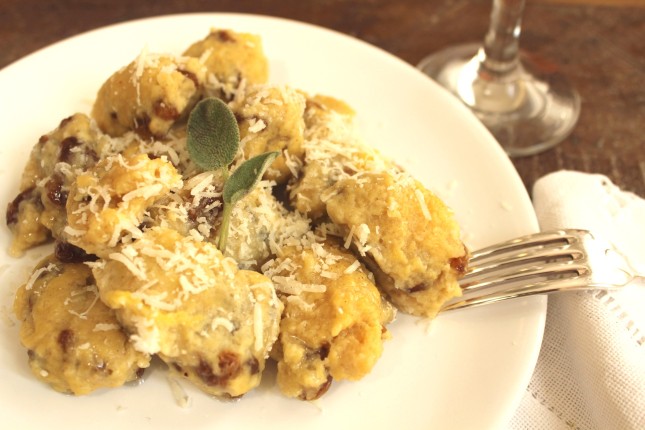
Gnocchi di Pane Raffermo (Stale Bread Dumplings)
12 Mar
This is a quick and easy recipe for gnocchi made with stale bread!
These bread dumplings, also called Zanzarelli, are an ancient food. They began to appear in the Renaissance banquets in Lombardy as a delicacy and were prepared with bread crumbs, milk and chopped almonds. The recipe that I am proposing belongs to my family’s culinary traditions. I remember that I prepared these delicious dumplings with my grandmother at least once a week, especially on Friday (the gnocchi day). This dish is very tasty and can satisfy the palates of lovers of sweet-savory combinations and spicy food. The recipe includes stale bread, raisins, cinnamon, nutmeg and grated Parmesan cheese. Once boiled, the dumplings are served with melted butter flavored with sage. The sage’s aroma gives a fragrant and delicate taste to this recipe. You can enjoy it as a first course or as main dish. These are an excellent alternative to the traditional potato dumplings (see post gnocchi di patate) and can also be an appetizing vegetarian dish containing, however, eggs.
GNOCCHI DI PANE (STALE BREAD DUMPLINGS)
Preparation time: 20 min. Cooking time: 1-2 min. Servings: 4
INGREDIENTS
180 g (6.5 oz) stale bread
150 g (5 oz) raisins
140 g (5 oz) grated Parmesan cheese
160 grams (1 cup) all-purpose flour
2 eggs
1 teaspoon cinnamon
Pinch nutmeg
Salt
Milk
Dressing
60 grams (2 oz) unsalted butter, melted
3 sage leaves
DIRECTIONS
1. In a large bowl soak the bread with milk. Let stand for about 15 min. until the bread is completely softened
2. Meanwhile in a small bowl, soak the raisins in lukewarm water for 5 minutes
3. Squeeze the bread with your hands to completely eliminate milk. In a large bowl combine bread, Parmesan, cinnamon, nutmeg, salt, strained raisins, egg and flour. Mix with a wooden spoon until dough is smooth. The amount of flour should be adjusted after cooking a couple of dumplings as a test (See next point)
4. In a pot, bring plenty salted water to a boil. Drop in a small ball of dough (teaspoon-sized). Before cooking the entire amount of dough, I suggest you do a test with a couple of dumplings to see if the dough is set. The right dumpling should be firm but not hard and does not break into pieces in the water. If it breaks , you should add 1-2 tablespoons of flour and repeat the test.
5. Remove the dumplings with a slotted spoon as soon as it floats, about 1-2 min.
6. In a separate sauce pan melt the butter with sage, to give the flavor. Arrange gnocchi on a serving plate and toss with the flavored butter and grated Parmesan cheese.- Paola
Featured Posts
-
Followers
My beloved readers, I would like to ask you a favor. Since the begining of July the new passionandcooking has been online, unfortunately some of your emails got lost. Can you please check if you are still registered at Passion and Cooking ? Did you get a notification about my latest posts? If you did […]
-
Spaghetti di Zucchine con Pesto e Pomodorini (Zucchini Spaghetti with Pesto and Cherry Tomatoes)
My beloved readers you can read this post on the new Passion and Cooking. Please accept my apologies, we are still working on the new site. Paola
-
New Passionandcooking
My Beloved Readers, I would like to inform you that starting from July 3rd Passionandcooking has a fresh look, please check it out. Your feedback is very important. It is possible that this week you will not get a notification about the latest recipes published because we are still working on the subscribe section. Please accept […]
-

Sorbetto al Limone (Lemon Sorbet)
This is a perfect summer treat, refreshing and beautifully light. You can serve it either as a dessert or as a palate cleanser between meals. Sorbet traces back its origins from the Chinese in the VII A.C. The Greeks thought it was a nectar of the Gods, the Romans loved it, and still in the […]
-

Strudel di Verdure (Vegetable Strudel)
When we think about strudel, we usually imagine the delicious pastry roll filled with apples, raisins and cinnamon, which is a traditional dessert of Trentino Alto Adige. The term derives from the German word “strudel” which means vortex; in fact, this stuffed roll, made with a very thin dough, is typical of the Italian regions […]
