Archive | Appetizers RSS feed for this section

Strudel di Verdure (Vegetable Strudel)

24 Jun

When we think about strudel, we usually imagine the delicious pastry roll filled with apples, raisins and cinnamon, which is a traditional dessert of Trentino Alto Adige. The term derives from the German word “strudel” which means vortex; in fact, this stuffed roll, made with a very thin dough, is typical of the Italian regions that were part of the Austro-Hungarian Empire. The version that I propose here uses a different filling: fresh seasonal vegetables, sautéed in olive oil and flavored with fresh mint. A touch of robiola (anItalian soft-ripened cheese of the Stracchino family, (see focaccia di Recco) gives a creamy taste to this recipe. This tasty strudel is ideal as an appetizer or light vegetarian lunch. The preparation is quick and simple, and I recommend using puff pastry to speed things up. The traditional strudel dough is made of flour, oil and water and is pulled very thin, until it’s almost transparent; this is the secret and also the hardest part! You can also prepare the strudel in advance and then heat it in the oven a few minutes before slicing and serving.

STRUDEL DI VERDURE (VEGETABLE STRUDEL)
Preparation time: 50 min.                    Servings: 6

strudel di verdure fetta


INGREDIENTS
1 medium red onion
200 g (7 oz) zucchini, cut into julienne strips
200 peppers (7 oz), cut into julienne strips
200 g carrots (7 oz), peeled and cut into julienne strips
3 mint leaves, chopped
5 tablespoons of olive oil (extra virgin)
100 g (4 oz) robiola, soft cheese
3 tablespoons grated Parmesan cheese
Salt and freshly ground pepper
230 g (8 oz) puff pastry (disc)
1 beaten egg

DIRECTIONS
Preheat oven to 180 ° C
1. In a pan sauté onion over medium-low, just until soft. Add carrots and peppers. After a few minutes (about 5) add zucchini, and salt and pepper to taste. Cook for about 5-7 min., Vegetables should be crunchy. Add mint. When done, drain the vegetables on paper towels to remove excess olive oil
2. Place the puff pastry disc on parchment paper. Spread with vegetable filling, leaving a border of about 5 cm (2 inches). Distribute pieces of the robiola cheese on top and sprinkle with Parmesan cheese
3. Roll up the strudel and close the ends to seal in the stuffing. Brush with egg and bake on a baking sheet covered with parchment paper for about 35-40 min. Remove from oven and let stand on a rack for a few minutes. Serve warm. Paola

Bruschetta al Pomodoro (Tomato Bruschetta)

8 Jun

Bruschetta (broo-SKAY-tah) is a perfect appetizer to serve with an aperitif; it’s fast and easy to prepare. The ingredients are simple: bread, tomatoes, olive oil (extra-virgin of course), basil and garlic, but the result is wonderfully flavorful. The type of bread that I use is homemade bread from Puglia or Tuscany. The quality of tomatoes is very important; they should be mature, sweet and full of flavor. They should also have a thin skin, because they should not be peeled. Bruschetta is a native of Rome, where “bruscare” means simply “to toast” in the Roman dialect. Originally a simpler version existed: only bread and olive oil. Today it is also a typical dish all over central Italy – Umbria , Tuscany and Abruzzo – and is prepared using tomato, too. I personally prefer this version; I find it more tasty and inviting, perfect for a summer cook out.

BRUSCHETTA AL POMODORO (TOMATO BRUSCHETTA)
Preparation time: 10 min. Servings: 6 people Bruschetta al pomodoro INGREDIENTS
12 slices crusty bread
8 ripe tomatoes

18 basil leaves
4 garlic cloves
Salt
Extra-virgin olive oil

DIRECTIONS
1. Wash the tomatoes and dice them into small pieces. Place in a bowl and season with a pinch of salt, 5-6 basil leaves and a clove of garlic cut in half. Allow to stand for 10 min. Remove the liquid and drizzle with some olive oil
2. Slice the bread ( 15x5cm, 6x2inch thickness 2.5 cm, 1 inch). Toast it on the grill or under the broiler. Rub with a clove of garlic cut in half and cover with the tomato mixture. Garnish with a basil leaf and serve warm. Paola

Farinata di Ceci (Chickpea Flatbread)

23 May

I love chickpeas and everything made with these tasty legumes. They have a delicious, slightly nutty flavor that goes well with many dishes. In addition they are very nutritious because they contain a lot of protein, minerals and vitamins (see chickpea salad). Farinata (Fah-ree-NAH-tah) is a tasty flatbread made with chickpea flour, and it is typical of Liguria, particularly from Genoa. It has a long history; it is thought to date back to the Greeks and Romans, when soldiers prepared it for their meals as a substitute for bread. The traditional recipe uses only four ingredients: chickpea flour, olive oil, water, salt. I like to enrich it with ground pepper and chopped rosemary leaves, a flavorful note to this delicate and delicious recipe. The preparation is very easy: just mix the flour and water. Instead, the “hard-work” is waiting the 12 hours needed to allow the chickpea flour to absorb the water. This delectable dish can be served as an appetizer or a snack, and it’s a healthy alternative to offer to our kids. In the past it was a common afternoon snack after school: tasty and good for you. If you want to prepare a gluten-free meal, this recipe will be a hit.  A personal recommendation: eat it warm . If there is any leftover (which I doubt!), heat it for a few minutes in a hot oven.

FARINATA DI CECI (CHICKPEA FLATBREAD)

Preparation time: 10 min. (plus 12 hours)  Cooking time: 35 min.  Servings: 8

Farinata di ceci


INGREDIENTS
330 g (12 oz) chickpea flour
950 ml (4 cup) water at room temperature
80 ml (1/3 cup) olive oil (extra-virgin)
Leaves of 1 sprig of rosemary, chopped
Salt
Freshly ground pepper

DIRECTIONS
1. In a bowl, dissolve flour in the water, stirring with a whisk and making sure that there are no lumps, until mixture is liquid and homogeneous. Let it stand covered with a lid for 12 hours at room temperature
2. Preheat oven to 220° C (425 °F)
3. After 12 hours, if there is some foam on the surface, remove it with a spoon. Add salt, pepper, rosemary and half of the oil. Stir
3. Pour the other half of oil in a 32 cm (13 inch) diameter metal pan. Pour in the batter and bake for about 35 minutes until the surface is golden brown. Serve warm. Paola

Mascarpone Fatto in Casa (Homemade Mascarpone Cheese)

2 May

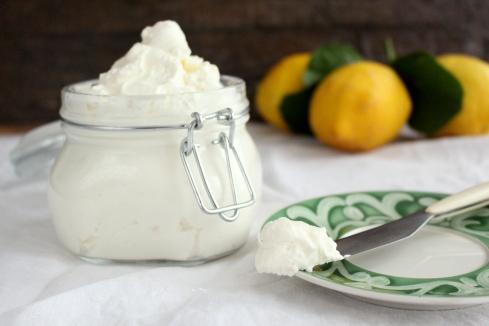
I bet that you have tried tiramisù at least once in an Italian restaurant, that creamy Italian dessert made with a magic ingredient: mascarpone cheese. Today I will share a little secret with you: how to make mascarpone at home! Making cheese can certainly seem difficult, but preparing mascarpone is very easy -it only requires ten minutes of your time and just two ingredients: cream and freshly-squeezed lemon juice. What you really need is patience for the cooling time in the refrigerator, that’s it. The smooth texture and the mouthwatering taste of fresh homemade mascarpone can’t be compared to one you buy, and I doubt you will ever buy it again. In Italy we use mascarpone for both savory recipes (for example, datteri ripieni con mascarpone e noci), as well as pies and sweet recipes (panettone con crema al mascarpone, pandoro alla crema di limoncello). Mascarpone originated in my region of Lombardy, probably in the 16th or early 17th century. Nowadays it is recognized as a prodotto agroalimentare tradizionale (tradtional food product).

MASCARPONE FATTO IN CASA (HOMEMADE MASCARPONE CHEESE)
Preparation time: 9 hrs                       Yield: 300 g (1 ½ cups, or 11 oz)

Mascarpone


INGREDIENTS
500 ml (2 cups) cream (not ultra-pasteurized)
7.5 ml (½ tablespoon) freshly-squeezed lemon juice

DIRECTIONS
1. In a medium saucepan, heat cream on a medium low flame, stirring constantly with a whisk until it reaches the temperature of 85°C (185°F)
2. Very slowly add the lemon juice stir and continue to cook until the cream thickens to coat the back of a spoon (about 8-10 min). Remove from the heat and let it cool at room temperature for about 35 min.
3. Line a colander with a cheese cloth and place it on top of a bowl. Pour in the cream, scraping the pan with a spatula, and let it cool completely
4. Cover with plastic wrap and let it rest in the fridge for at least 7-8 hours. If I have to use mascarpone for my tiramisù, I usually check it after 7 hrs because I prefer it very creamy. The texture of tiramisù is smooth. The more you live it the fridge the more dense it becomes
5. Transfer mascarpone to an airtight container. It can be stored in the fridge for about 3-4 days. Mascarpone is good fresh.
Note: The refrigeration temperature and time are critical. It should be 4°C (39°F), and the longer you leave it in the fridge the thicker it becomes. The mascarpone consistency is like the Philadelphia cheese. The quantity of lemon juice is usually 7.5 ml (½ tablespoon) per 500 ml (2 cups) of cream, but the quantity of citric acid in each lemon can vary a little bit. If the cream does not start to thicken after 5-7 min. of cooking, you can add a few more drops of lemon juice. Paola

Pizza Rustica (Rustic Pizza)

17 Apr

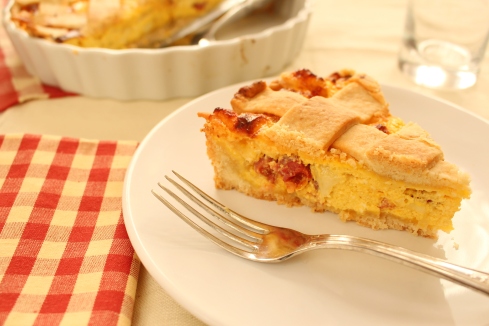
This pizza is a little bit a different from what you imagine about pizza, but it’s still delicious! Pizza rustica is a typical recipe for Easter, especially for the Easter Monday picnic, Pasquetta, but I prepare it as an aperitif or appetizer for a casual dinner with friends throughout the year too. To tell the truth it is not a real pizza but a pie with a buttery crust, filled with eggs, ricotta cheese, mozzarella, Parmesan and spicy pepperoni, a very appetizing mix. Ricotta is a fresh cheese with a delicate flavor that blends perfectly with the peperoni. There are several variations of pizza rustica with different crusts depending on the region where it is prepared. Some people use a yeast dough as a crust, others add different types of cheese. This recipe is the one I love the most, one that my children especially enjoy.

PIZZA RUSTICA (RUSTIC PIZZA)
Preparation time: 60 min . Cooking time: 40 min. Servings: 6

Pizza rustica

INGREDIENTS
Pie dough
350 g (2 ¼ cups ) flour 00
5 g (1 teaspoon) salt
5 (1 teaspoon) sugar
5 g (1 teaspoon) baking powder for pizza or focaccia
170 g (6 oz) butter, cold, cut into pieces
70 ml (heaping ¼ cup) cold water
Filling
350 g (12.5 oz) ricotta cheese
3 eggs
75 g (¾ cups) grated Parmesan cheese
250 g (9 oz) mozzarella cheese (see note below), cut into cubes
100 g (3.6 oz) pepperoni
salt and pepper

DIRECTIONS
1. For the pie dough. In a large bowl mix the dry ingredients (flour, salt, sugar and baking powder). Add butter and work with a pie cutter until the mixture is sandy. Add water, working first with a spoon and then with floured hands to form a ball. Wrap in cling film and leave in the fridge for about 20 minutes.
2. Prepare the filling. In a medium bowl mix the ricotta with a fork and then add the eggs. Beat with a spoon to obtain a creamy mixture. Stir in the Parmesan cheese, mozzarella and pepperoni. Add salt and pepper to taste
3. Preheat oven to 180 ° C
4. Remove the dough from the fridge. Spread 2/3 of dough with a rolling pin on a floured surface with 2-3 mm thickness. Transfer the dough into a ceramic pan (25 cm, 10 inch) in diameter, puncture the bottom with the tines of a fork, pour in the filling and level. Roll out the remaining third of the dough. Cut into 6 mm wide strips with a knife and form a latticework over the filling
5. Bake for 40 minutes or until golden brown. Remove from oven and let it cool on a rack for about 20 minutes. Serve warm or at room temperature.

Note: I would suggest using a pizza mozzarella because fresh mozzarella has too much liquid in it. If you can’t find it, Caciocavallo cheese and Provolone cheese are good substitutes for pizza mozzarella. Paola

Involtini di Prugne e Bacon (Prunes and Bacon Rolls)

6 Apr

This a fast and irresistible appetizer prepared with only two ingredients: prunes and bacon. Pitted prunes are wrapped with bacon and cooked in the oven until bacon becomes crispy and tasty. The combination of prunes and bacon is delicious: the sweet flavor of prunes mix well with the bacon’s salty taste. When the bacon fat melts during cooking, it lends a special touch of extra flavor to the prunes. When you start eating these appetizing bites, it is hard to stop…..uno tira l’altro!

INVOLTINI DI PRUGNE E BACON (PRUNE AND BACON ROLLS)
Preparation time: 10 min. Cooking time: 10 min Servings: 4

Involtini di prugne e bacon

INGREDIENTS
8 thin slices of bacon
8 pitted prunes
8 toothpicks

DIRECTIONS
1. Preheat oven to 180 °C
2. Soak prunes for 8 min. in water. Remove and dry
3. Wrap each prune with a sheet of bacon (about 15 cm long and 2.5 cm wide ). Pierce a toothpick through center of prunes to hold bacon into place
4. Arrange the rolls on a baking sheet covered with a baking paper
5. Bake for 8-10 minutes, turning once, until bacon is crispy. Remove from oven and serve hot.

Note: You can substitute the prunes with almond-stuffed dates. -Paola

Focaccia di Recco

23 Mar

Focaccia di Recco is a delicious snack that can be enjoyed any time during the day. When we think about focaccia, we usually think about bread dough with yeast; instead the peculiarity of the focaccia di Recco is the lack of yeast! For this reason it is also good for people who are intolerant to this ingredient.

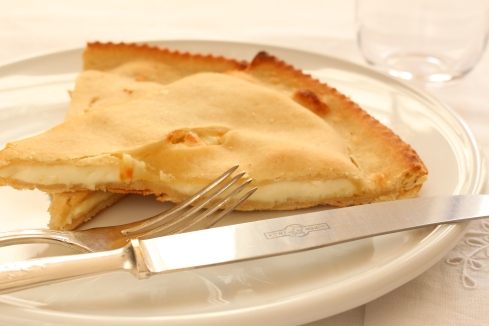
It takes its name from the town of Recco in the Ligurian Riviera di Levante. The dough is very simple, made ​with flour, extra virgin olive oil, salt and water. The filling is stracchino or crescenza, a soft cow’s-milk cheese with a mild and delicate flavor. The name stracchino comes from the Italian word “stracca” meaning tired. This refers to the fact that the milk from the tired cows coming down in autumn from the alpine pastures, is richer in fat and it has a characteristic taste. The delicious combination of this dough and stracchino makes this preparation unique, a special treat for both adults and children. My kids love it for a quick lunch after school or for an afternoon snack. You can also serve it as a tasty appetizer with a glass of prosecco.

The history of focaccia di Recco is ancient and dates back to the third crusade. It was an affordable food when only simple ingredients were available. At the end of the 1800s it was added to the menu of the various local trattorie (rustic restaurant) as a special dish for the Day of the the Dead, celebrated on November 1st. Today it is enjoyed all year round and not just in Liguria!

FOCACCIA DI RECCO
Preparation time: 150 min . Cooking time : 10 min. Servings : 6 people

Focaccia di Recco

INGREDIENTS
320 g (2 cups) Mannitoba flour
200 ml (1 scarse cup) water, room temperature
8 g (1 heapping teaspoon) salt
45 ml (3 tablespoons) olive oil (Extra virgin)
500 g (19 oz) stracchino or crescenza cheese

DIRECTIONS
1. In a medium bowl combine water and oil, then dissolve salt
2. Place the flour in a large bowl, add the liquid. Start mixing with a fork incorporating the flour little by little, then mix with a wooden spoon until you obtain a smooth dough. Transfer to a floured work surface and knead (about 10 min.) with your hands until the mixture is uniform and elastic. Wrap in plastic paper and let it rest for about two hours at room temperature
3. Divide the dough into two equal parts and roll out with a rolling pin on a floured work surface trying to keep it as round as possible and pretty thin, about 1.5 cm. Now the hard part comes: you’ll have to pull the dough with your hands (floured) until it is almost transparent. It is important not to have holes in the dough, otherwise the cheese will come out when it bakes
4. Preheat oven to 230 °C (450 °F)
5. Grease a round baking pan (30 cm, 12 inch diameter) with olive oil and place a sheet of dough on it, cover with the cheese cut into pieces (not too small). Cover with the other sheet, sealing the edges well with your hands and pinching the surface 5 or 6 times. Brush the top with olive oil
6. Bake for 10-15 minutes until the surface is golden Serve hot. If there is any left which you can it heat it again in a hot oven for a few minutes. Paola

Tortino con Patate e Scalogno (Potato and Shallot Pie)

3 Mar

An appetizing pie made ​​with potatoes, shallots and hard-boiled egg yolk to get a colorful, mimosa-like colorful effect. A different idea to celebrate Women’s Day on March 8th

This recipe is a simple, versatile and absolutely delicious one to enjoy either as an appetizer or as a main course accompanied by a fresh salad. The delicate but distinct flavor of shallots blends well with the starchy taste of potatoes. The addition of cream makes this pie velvety and inviting. The crumbled egg yolk is an additional decoration to create the mimosa effect and makes this pie perfect to celebrate Women’s social, economic ,and political achievements. This holiday was first celebrated in the United States in 1909 and arrived in Italy in 1922. The mimosa flower, with its intense and radiant color, was chosen as a symbol because it blooms in early March. The addition of boiled egg yolk is not essential and can be omitted, but this pie makes a savory version of the famous mimosa cake dessert.

TORTINO CON PATATE E SCALOGNO (POTATO AND SHALLOT PIE)
Preparation time: 45 min.  Cooking time: 20-25 min.   Servings: 8

Tortino con patate e scalogno

INGREDIENTS
800 g (28 oz) yellow potatoes, peeled
250 g (9 oz) shallots, finely sliced
4 tablespoons olive oil (extra virgin)
250 ml (1 cup)fresh cream
2 teaspoons oregano
Salt and freshly ground pepper
230 g (8 oz) puff pastry , round shape
5 hard-boiled eggs

DIRECTIONS
Preheat oven to 180 °C (350 °F)
1. Peel potatoes, put them in a pot and cover with cold water. Turn on the heat and bring to a boil. Cook for about 8-10 minutes ( the cooking time depends on the size of the potatoes) until the potatoes are cooked, but not soft. Remove from the water and allow to cool
2. While potatoes cool, in a saucepan over medium heat, sauté shallots in olive oil, stirring occasionally until it is tender. Remove from heat and allow to cool for 5 minutes
3. In a bowl combine shallots, ​​potatoes (thinly sliced) and cream. Add the oregano and season with salt and pepper
4. Roll out the pastry into a ceramic pie plate (diameter 23 cm, 9 inch) , pour in the vegetable mix
5. Bake for about 20-25 minutes until golden brown
6. While the cake is cooking, prepare the hard-boiled eggs. Place the eggs in boiling water and cook for 10 minutes. Cool. Remove the shell, cut in half, remove the yolk and crumble with your hands
7. Remove the pie from the oven. Allow it to cool on a wire rack for 10 minutes. Garnish with crumbled egg yolk and serve warm. – Paola

Peperoni Grigliati (Grilled Peppers)

17 Feb

An appetizing and tasty antipasto to serve with toasted bread or a side dish with meat.

When peppers are grilled, they taste completely different from raw ones and, in my opinion, are more appetizing and certainly more easily tolerated, since the indigestible substances that are contained in the peel are removed. This is an easy recipe and quick to prepare; you can prepare it a day in advance and then store it in the refrigerator. The dressing is made with parsley, anchovies and chilli peppers. All these ingredients enhance the smoky flavor of the peppers and make this dish a delicious antipasto (appetizer) that you can serve with fresh bread or baguette croutons.

Peppers are originally from South America, but nowadays they are used all over the world in many delicious recipes. They contain a lot of water (90%) and are, therefore, indicated in low-calorie diets. They also contain high amounts of vitamin C and beta-carotene and are, consequently, very healthy .

There are several ways to grill peppers; I suggest this one which is, in my opinion, the most simple and effective method.

PEPERONI GRIGLIATI (GRILLED PEPPERS)
Preparation time: 40 min. Cooking time: 25 min. Servings: 4

Peperoni grigliati

INGREDIENTS
4 bell peppers of different colors
6 anchovy fillets in olive oil, finely chopped
2 garlic cloves , finely chopped
2 teaspoons of parsley, chopped
1 small red pepper, seeded and finely chopped
4 tablespoons olive oil (extra virgin)

DIRECTIONS
Preheat oven to 250 °C (475 °F)
1. Wash and dry whole peppers. Place on a baking sheet covered with parchment paper. Bake for 25 min. turning when the side in contact with the heat is charred. The cooking time may vary depending on the size. As soon all the skin is charred, remove from the oven
2. While the peppers are still hot, place each one in a plastic food bag (to facilitate removal of the skin) and wait for 15 minutes. After this time remove from the bag. The skin will come off very easily. Remove stalk using a sharp knife. Cut peppers in half and lengthwise into strips, removing seeds and white filaments. Cut peppers into strips
3.In a small bowl, combine the anchovies , garlic , parsley and chili pepper with oil. Put the peppers on a serving dish and sprinkle with the seasoning mixture. Allow to marinate at room temperature for at least an hour. Serve at room temperature .

Note: At the time of purchase make sure that the peppers are well attached to the stem; they should also be shiny, compact and with the skin taut. They keep fresh in the refrigerator for 5-6 days, or in oil and vinegar (refrigerated) for several weeks. Paola

Tortino con Bietole ed Acciughe (Swiss Chard and Anchovies Pie)

29 Jan

This pie makes a colorful and a tasty starter or a delicious main dish. The crust is made ​​with brisee dough while the filling is prepared with Swiss chard, first boiled, then sautéed with anchovies and mixed with fresh ricotta cheese. This is a superb combination of flavors.

Swiss chard is native to southern Europe where it grows spontaneously. It belongs to the same family as beets and spinach; its bitterness fades when cooked, leaving a more delicate taste than spinach. Like all dark green vegetables, it contains large amounts of vitamin A, fiber and folic acid. It is a low-calorie vegetable and is therefore a perfect choice for a weight-loss diet, especially if eaten boiled and dressed with oil and lemon. Furthermore this tasty vegetable can be a nutritious addition to pasta (see pizzoccheri ) and soups!

 TORTINO CON BIETOLE ED ACCIUGHE (SWISS CHARD AND ANCHOVIES PIE)
Preparation time: 70 min.          Cooking time: 45 min.           Servings: 6

Tortino bietole fetta

INGREDIENTS
Brisee dough (see tortino al cavolo nero )
600 g (about 1 1/2 pounds) Swiss chard (leaves)
2 garlic cloves
3 anchovies “sott’olio” canned
3 tablespoons olive oil (Extra Virgin)
130 g (heaping 3/4 cup)  ricotta cheese
Salt and fresh ground pepper

DIRECTIONS
1. Prepare brisee pie crust 
2. Wash Swiss chard, cut off the white stalk (you can use in other recipes see note) and blanch the leaves for 8-10 minutes. Drain and let cool. Cut into segments of about 1 cm (0.4 inch) long
3. In a large skillet over medium-low heat sautée garlic in the oil for 4-5 min., being careful not to burn it. Chop the anchovies, add to the oil and stir until they beging to “melt”. Add chard, season with salt and pepper. Allow to cook for 10 minutes , stirring occasionally. Turn off the heat and let cool
4. In a bowl work ricotta cheese with a fork, add the vegetable mix and season with salt and pepper
5. Heat the oven to 170 °C (350 °F)
6. In a 25 cm (9 inch) round baking pan, roll out the dough to 2-3 mm thick, puncture the bottom with a fork, pour in the filling and bake for about 40-45 min. Serve warm.

Note: When you buy Swiss chard look for crisp, vibrant green leaves with non yellow or brown spots. You can enjoy the stalk as well. First boil them, then sautée in olive oil with garlic and pepper. Serve warm with grated Parmesan cheese. The cheese will melt and give a special taste to this dish. – Paola

Pane Toscano (Tuscan Bread)

27 Oct Pane Toscano

“L’uomo non vive di solo pane / Man does not live by bread alone” … but this certainly doesn’t seem to apply in Tuscany. For centuries Tuscan bread has been a staple for the poor. The Tuscan bread recipe is salt-free, therefore called in Italian “pane sciapo”. In fact, its taste goes well with traditional Tuscan cuisine rich in salt and abundant flavors. It has a crispy reddish crust, while the interior is soft, but not spongy . It is a perfect base for delicious appetizers or “stuzzichini”. It can be served with tasty cured meat products, “affettato”,  such as Tuscan Prosciutto Crudo, salami (fennel-flavored finocchiona) or Tuscan pecorino cheese, and it is one of the most appetizing ways to start a meal. It can also accompany savory soups such as “ribollita” and “pappa al pomodoro”.  It can also be used for the typical “panzanella”, a bread and tomato salad. Moreover it is very palatable in the form of crouton slices, thin pieces of grilled or fried bread. The croutons are very good with chicken liver pate’, olive paste, or as the base of the famous “bruschetta” with olive oil, garlic, tomatoes and fresh basil. The lack of salt has historical roots: around the twelfth century, because of the struggle between the cities of Pisa and Florence, the maritime republic stopped the salt trade to the countryside, and because of this the farmers had to prepare their bread without salt. Today, this tradition is generally maintained, although nowadays in some areas of Tuscany bread is lightly salted. You can add a small amount of salt (about 5 g (1 tsp) for 500 g of flour, 3 cups), according to your taste and to match the food you are eating.

TUSCAN BREAD
Preparation time: 3 hours  Cooking time: 35-40 minutes  Servings: 8

IMG_1904

INGREDIENTS
500 g (3 cups) gluten-rich flour (Manitoba)
260 ml (1 cup + 2 tablespoons) water at 45 °C -110 °F
5 g (1 tsp) sugar
1 package (7 g, 1 heaping teaspoon) dried yeast or 1 cube (25 g, about 1 ounce) fresh yeast
2 tablespoons olive oil (Extra Virgin)

DIRECTIONS
1. In a small glass or bowl, dissolve in about 100 ml of the warm water, sugar and yeast. Sugar is the so-called ” food” for the yeast
2. In another bowl, mix the remaining water well with the oil
3. Pour the liquid containing sugar and yeast into a large glass bowl. Add half of the flour and mix well until smooth
4 . Continue adding the remaining flour and the water with olive oil until a smooth ball can be formed
5. Remove the dough from the bowl and knead on a lightly floured surface, by hand for about 10 minutes. Do not add too much flour otherwise the dough will become tough
6. Put the dough in a glass bowl and let rise for about 20 min. Cover with a cotton towel. Let rise in a warm draft-free place at a temperature of approximately 30°C or 85°F.
7. After this time, knead the dough on a floured work surface about a dozen times.
8. Form a strand without handling it too much, cover with a sprinkling of flour , place on a baking sheet previously covered with greaseproof baking paper . Let rise for about 2 hours covered with a cotton towel.  Remember that the dough should rise in a warm room.
9. Preheat oven to 180 °C.
10. Bake for 35-40 minutes until golden brown.
11. Remove from oven and let cool on a rack.  – Paola

Crocchette di Patate (Potato Croquette)

6 Oct

Potato croquette is a small breaded, fried potato roll, usually shaped into a cylinder. It is an Italian classic that can be served either as a tasty appetizer or a fancy side dish. A plate of croquettes becomes something a bit more special when stuffed with cheese or ham, and it can even be served as a main course, delighting both kids and adults. My kids love when I prepare them, they disappear in a blink of an eye!  The term croquette originates from the French croquer “to crunch”.  Croquettes are easy and quick to prepare, but in spite of this the result is spectacular. The use of simple ingredients, such as mashed potatoes, eggs, Parmesan cheese and spices, provide a soft texture and a delicate and appetizing taste. Of course, frying adds an extra mouth-watering flavor.

CROCCHETTE DI PATATE (POTATO CHROQUETTE)
Preparation time: 40 minutes                            Servings: 8 Crocchette di patate

INGREDIENTS
800 g (28 oz) potatoes
100 g (1 cup) grated Parmesan cheese
1 egg yolk
Grated nutmeg, a pinch
Salt and freshly ground pepper, to taste
2 eggs
Breadcrumbs
Oil from frying

DIRECTIONS 
1. Cook the potatoes until just tender either by boiling or baking.  The potato flesh for croquette should be dry, therefore it is better to boil the potato in the skin to prevent water absorption.  Drain well and set aside until just cool enough to remove the skin.  The potatoes should be warm
2. Put the warm potatoes through a potato ricer (never a mixer) into a bowl, season to taste with salt, nutmeg and pepper. Add the egg and Parmesan, mix just enough until the dough is formed
3. Take an abundant tablespoon of dough and make a cylindrical shape. In a bowl beat the eggs, one at a time pass each croquette in the egg then in breadcrumbs . Continue until all the dough is finished
4 . In a frying pan (better in a deep fryer ) heat plenty of peanut oil to 180° C (350° F) . If you do not have a cooking thermometer to check the temperature, you can test with a small piece of bread . If after 60 seconds is colored, the oil temperature is perfect. Put 3-4 croquettes at a time into the pan, in this way you prevent to lower the temperature of the oil 5 . When they are evenly gold, remove with a slotted spoon and place on a plate covered with paper towels. Serve hot.

Note: The type of potatoes is crucial (I strongly recommend to use patate farinose, rich in starch) as well as the potato ricer. – Paola

Alici Marinate con Cipolla e Peperoncino (Marinated Anchovies with Onion and Hot Chili Pepper)

29 Jul

Marinated anchovies is a tasty, cold antipasto that can be served with homemade bread (pane casereccio) or enjoyed as a main dish with a fresh salad. The simple dressing prepared with olive oil, lemon juice and vinegar enhances the flavor of the anchovies, so reminiscent of the sea, while the onion and chili pepper make this dish even more flavorful. This is a typical Mediterranean dish, and fish is the star ingredient. Anchovies are native not only to the Mediterranean sea but are also found in the Baltic Sea and the Atlantic Ocean. They are tasty, rich in protein, iron and omega-3 fatty acids, (very important for regulating lipid metabolism and blood fluidity). You can enjoy anchovies either fresh or preserved in salt or olive oil. They are excellent for preparing sauces and, of course, on pizza – do not forget the tasty Neapolitan pizza! Marinated anchovies are something you can prepare in advance, because they keep well in the refrigerator for several days.


ALICI MARINATE CON CIPOLLA E PEPERONCINO (MARINATED ANCHOVIES WITH ONION AND HOT CHILI PEPPER)
Preparation time: 20 min.           Marinating time: 6 hours            Servings: 4

Alici Marin
INGREDIENTS
600 g (21 oz) fresh anchovies
2 cloves of garlic
1 white onion, sliced
1 hot pepper, sliced
2 lemons, juiced
2 tablespoons white wine vinegar
6 tablespoons olive oil (Extra Virgin)
Salt and freshly ground pepper to taste

DIRECTIONS
1. First, prepare the marinade. In a bowl mix well oil, vinegar, lemon juice and add garlic cloves, a pinch of salt and pepper
2. Clean the anchovies. Flake with a knife, remove the head, cut the anchovies open lengthwise along the belly, remove the entrails and the spine and other bones. Wash thoroughly under running water and pat dry with paper towels
3. In a large glass or ceramic bowl (see note) first pour in a layer of marinade, then a single layer of anchovies, and then sprinkle with some of the onions and peppers. Repeat this process until all of the ingredients have been used, so that the anchovies are completely covered by the marinade. Marinade for at least 6 hours in the refrigerator until the flesh of the anchovies is white and firm.

Note: When you purchase anchovies you can verify the freshness from its color; it should be bright and intense, the body should be firm. The marinade is a process during which the meat is cooked by the acids contained in the liquids used. It is important not to use aluminum or copper containers, because in contact with the acids can release toxic compounds. – Paola


Albicocche Ripiene con Caprino e Noci (Apricots Stuffed with Goat Cheese and Pecans)

16 Jul

Fruit is the real star of this recipe which, although very simple, is exquisite and perfect for a tasty summer aperitif. This should hardly be called a “recipe”; you just assemble three ingredients: apricots, fresh goat cheese and nuts. The result is extraordinary!: colorful and tasty. The slightly acidic taste of goat cheese goes well with the apricot’s sweet taste and the crunch of the walnuts. You can enjoy this dish at room temperature, this enhances the apricots’ delicate aroma. Apricots are one of the summer’s symbols, rich in vitamin A, C, PP, minerals and dietary fiber, and for those who enjoy being in the sun, offers some additional natural protection. In fact, the high content of pro-vitamin A stimulates the production of melanin, the substance responsible for tanning and skin protection from the sun.

ALBICOCCHE RIPIENE CON CAPRINO E NOCI (APRICOT STUFFED WITH GOAT CHEESE AND PECANS)
Preparation time: 10 minutes                            Servings: 4

Albicocche con Caprino
INGREDIENTS
6 apricots
160 g (6 oz) fresh goat cheese, at room temperature
18 pecan halves or walnuts

DIRECTIONS
1. Wash the apricots under running water, dry them, cut them in half and remove the core
2. In a bowl, work the goat cheese until it is creamy.  Chop 6 walnut halves and add to the cheese. Stir
3. Fill the center of each apricot generously with cheese mixture and nuts. Decorate by putting a walnut half in the center of each.

Note: When buying apricots make sure they are firm but ripe. In winter you can substitute fresh apricots with dried ones.-Paola


Frese al Pomodoro (Frese with Tomato)

26 Jun

This is a simple recipe for an appetizing summer snack.  Frese are an excellent alternative to bread for appetizers, quick to prepare and definitely delicious to taste.  They are called frese in Calabria, frise or friselle in Puglia and freselle in Naples; it does not matter what you want to call them, they are wonderful!!  Frese, a type of twice-baked bread, are made with durum wheat. The ring shaped dough is baked until almost done, then cut in half and toasted in the oven again until it is as hard as a rock. This type of bread is an ancient recipe from the traditional peasant cuisine of southern Italy.  In the past frese were commonly used in place of bread; in fact, because they are dried they keep longer. To enjoy frese you should first wet them with water or tomato juice. The amount of water and the soaking time are personal: obviously more for a soft texture and less for a crunchier snack. You can serve them with fresh tomato, oregano, salt and olive oil. They are also very tasty with garlic and other ingredients for topping such as red pepper, black olives, tuna or anchovies. Be creative and use your favorite Mediterranean topping!

FRESE AL POMODORO (FRESE WITH TOMATO)
Preparation time: 30 minutes       Servings: 4

Fresa con pomodoro

INGREDIENTS
4 frese
4 large tomatoes
2 garlic cloves
2 tablespoons olive oil (Extra Virgin)
oregano
Salt

DIRECTIONS
1. Peel the tomatoes after blanching in boiling water for approximately 1 minute. This procedure allows  to remove the skin more easily. Cube the tomatoes, season with salt and let stand for about 10-15 minutes
2. Rub frese with garlic
3. Wet frese with plenty of tomato juice and let rest for about 15 minutes
4. Add olive oil and oregano to tomatoes.  Mix well and spread on frese.

Note: You can substitute tomatoes with cherry tomatoes, 4 cherry tomatoes per each fresa. – Paola

Brie in Crosta (Baked Brie in Puff Pastry)

25 May

Brie wrapped in puff pastry and baked until the cheese is hot and gooey and the crust is golden brown …  mmmmmmm! This is an elegant and tasty appetizer to serve at a dinner party to please and impress your guests.  It’s probably one dish that you don’t want to eat all the time (full of calories!), but when you do it is heavenly.   Try it on either toasted Italian bread or your favorite crackers. To fully enjoy Brie’s taste you have to eat it with its rind, a integral part of its flavor. Some cheeses are conserved in plastic wax or even natural rinds that have, however, an unpleasant taste; Brie’s rind, on the other hand, adds a pronounced and distinctive taste to the cheese, so please do not remove it. Brie is a soft French cheese named after the French region Brie, where it was originally created. It is a rich cheese but also a good source of protein, vitamin B12 and vitamin B2.  It is a popular cheese in Italy, even though we have a very similar one called Camoscio d’Oro.

BRIE IN CROSTA (BAKED BRIE IN PUFF PASTRY)
Preparation Time: 35        Baking Time: 15 min.                    Servings: 6

Brie con Fette di Pane

INGREDIENTS
200 g (14 oz) wedge of Brie
230 g – 1 sheet (½ pound) puff pasry
1 tablespoon water
Crackers or toasted bread

DIRECTIONS
1. Preheat the oven to 200 °C – 400°F
2. Shape the brie as a rectangle by cutting off the point (halfway between the tip and the outer edge), then divide the point longitudinally in half. Place the two thin triangles obtained along each side of the larger piece of brie to create a rectangle
3. Cut the puff pastry sheet to obtain a strip of about 25×15 cm (10×6 in), wrap the cheese completely as if making a little package like a gift
4. Wet the overlapping parts and seal the pastry by pressing firmly with your fingers. This step is very important to avoid having the cheese leak out during baking
5. Decorate the “package” with pieces of puff pastry in a design of your choice
6. Place the wrapped cheese on a baking sheet and bake for about 15 minutes or until golden brown
7. Let cool for 15 minutes, and serve with toasted bread or crackers.


Insalata di Pollo (Chicken Salad)

11 May

How about a refreshing summer salad made with grilled chicken breast, carrots, red pepper, celery, pickles and delicious Taggiasche olives?  The dressing is prepared with Greek yogurt, mayonnaise and flavored extra virgin olive oil.  The addition of olive oil lends a special taste to this salad, a Mediterranean touch.  Chicken is a healthy choice, in fact it contains less fat than beef or pork, and it is rich in vitamins and minerals; it is  therefore is an excellent choice for a light and nutritious diet .  In addition its milder taste complements a lot of dishes. This salad may be served on top of lettuce, tomatoes  (or the combination of them) or in a sandwich, and it is an easy dish to take on a summer picnic.  Try it cold or at room temperature, as an appetizer or main course.

INSALATA DI POLLO (CHICKEN SALAD)
Preparation time: 20 minutes                                       Servings: 4

Insalata di pollo piatto

INGREDIENTS
500 g (18 oz) grilled chicken
3 carrots, peeled and julienned
1 medium red pepper, julienned
3 celery stalks, diced
7 medium pickles, julienned
2 tablespoons Taggiasche olives

1 tablespoon chives, finely chopped
1 tablespoon Greek yogurt
1 tablespoon mayonnaise
1 tablespoon sweet mustard
4 tablespoons olive oil (Extra Virgin)
Salt and freshly ground pepper to taste

DIRECTIONS
1. Pound the breast chicken to 1 cm (½ in) thickness . Grill the chicken for about 3-4 minutes each side but not too long otherwise the meat will dry out. Let it cool and cut into strips 1 cm (½ in) wide and  6 cm (2 ½  in) long
2. Clean and wash  all fresh vegetables.  Julienne the carrots, the pepper and the pickles. Dice the celery. Pour all vegetables and chives in a large bowl.  Set aside
3. In a small bowl mix well the yogurt, mayonnaise, the mustard, salt and pepper.  Then slowly add the olive oil until well blended
4. Combine the vegetables and the chicken. Mix well and toss with the dressing
5. Cover with plastic wrap and refrigerate for at least 30 minutes. Serve cold or at room temperature.

Note: I partially substitute mayonnaise with Greek yogurt because it makes the dressing lighter. You can use a variety of mustards. I like sweet mustard, but you can substitute with your favorite one.  -Paola

Insalata di Polpo con Patate (Octopus and Potato Salad)

16 Apr

Octopus and potato salad, a refreshing and light dish that reveals the exquisite taste of the octopus.  It is a Mediterranean delight to enjoy either as an appetizer or a main course, served either warm or cold and accompanied by a glass of dry white wine.  The simple dressing made with olive oil and lemon juice brings out the flavor of the octopus and the potatoes. This is a lovely way to eat octopus, a low-calorie and lean seafood, and is an ideal way to get protein, minerals (especially iron), vitamins and antioxidants, without taking in too much fat.  The name of octopus derives from Greek,  octo eight and pous piede, with eight feet. Octopus is delightful, but it can be tricky to cook it, with possible results ranging from soft and tender to tough and rubbery.  The cooking time is critical for the best results, and I would recommend tenderizing it with a meat hammer (see note) before cooking.

INSALATA DI POLPO CON PATATE (OCTOPUS AND POTATO SALAD)
Preparation time: 1 h       Cooking time: 40 min.               Serving: 4

conchiglia con polpo

INGREDIENTS
1 whole octopus, about 900 g (2 pounds)
1 carrot
1 celery rib
1 yellow onion
2 bay leaves
1 black pepper corn
1 tablespoon white wine vinegar
2 garlic gloves, finely chopped
8 medium size potatoes
1 tablespoon chopped parsley
2 tablespoon capers, washed and dry
1 tablespoon lemon juice
3 tablespoons olive oil (Extra Virgin)
Salt and freshly ground pepper to taste

DIRECTIONS
1. Wash and clean the octopus, removing the ink sack and the internal parts
2. Prepare a pot of a vegetable stock with plenty of water and the carrot, celery, onion bay leaves, black pepper corn and vinegar.  Bring it to boil, and dip in only the tentacles (holding the head) 4-5 times to curl and soften them.  Then drop the whole octopus into the water, cover and cook on low heat for approx. 40 minutes
3. Meanwhile cube the potatoes and cook until tender in salted water
4. When the octopus is done boiling, remove it from the water with tongs, chop off the head (there is not a lot of good meat in it) and cube the tentacles in small pieces 2, 5 cm (1 in)
5. In a small bowl prepare the dressing by combining olive oil, lemon juice, salt, pepper, parsley and garlic
6. In a large bowl combine the octopus, the potatoes and the capers and season with the dressing.  Place it on a serving plate or in a shell.  You can either serve it warm or cold. You can, alternatively, also set the potatoes on a serving dish and place the octopus in the center, then add the dressing on top.

Note: When you buy the octopus, you can verify the freshness from its color; it should be bright and intense.  The octopus meat is soft and tender, but it can also rubbery depending on the preparation.  Traditionally, the octopus was beaten on the rocks to tenderize its meat.  If you don’t have a rocky coast just outside your kitchen door, you can tenderize it with a kitchen hammer for 10 min.  -Paola

Datteri Ripieni con Mascarpone e Noci (Stuffed Dates with Mascarpone Cheese and Nuts)

6 Apr

This is a simple, simply delectable recipe that you can make as a tasty appetizer to serve in a special occasion.  This is certainly a Mediterranean-inspired dish, a succulent combination of flavors, creamy and caramely, that you can easily get addicted to. The date tree originated around the Nile and Euphrates rivers of ancient Egypt and Mesopotamia.  Now, however, the date palm grows in warm climates on all continents.  Wonderfully delicious, dates are one the most popular fruits, packing lots of fibers, vitamins, antioxidants and minerals; they are an excellent source of iron.  I love dates: by themselves, stuffed or in sweets.

DATTERI RIPIENI CON MASCARPONE E NOCI (STUFFED DATES WITH MASCARPONE CHEESE AND NUTS)
Preparation time: 10 minutes                                       Servings: 4

Datteri con mascarpone2_small

INGREDIENTS
10 large dates
150 g (about 6 oz) fresh mascarpone cheese, at room temperature
1 tablespoon whisky or bourbon
10 pecan or walnut halves

DIRECTIONS
1. Make a slit in the center of each date.  Remove the pit
2. In a medium bowl combine mascarpone and whisky
3. Fill center of each date generously with the mascarpone cheese mixture and place a pecan halve over the filling.

Note: I think that Middle Eastern dates are the best, and I prefer large dark dates to the smaller, pale-brown ones that are commonly found.  You can store dates in a cool place, in an air-tight container, where they keep well for several months.  You can substitute the mascarpone cheese and whisky with either sweet Gorgonzola or brie, for a non-alcoholic version that is just as tasty.  -Paola

Torta Pasqualina (Easter Pie)

23 Mar

Torta Pasqualina is a rustic savory pie typical of Liguria, filled with spinach, ricotta cheese and eggs. You can serve it as an appetizer with a nice sparkling wine (I love it with my Prosecco) or as an antipasto (starter) anytime of the year, but this dish is really part of the traditional Easter (Pasqua) dinner or served at the Easter Monday (little Easter, “Pasquetta”) picnic with family and friends. In fact you can prepare it a day in advance and enjoy it cold the next day. Torta Pasqualina traces its origins back to 1400 when it was prepared to celebrate Easter Sunday after Lent, a period of time marked by fasting. Catholics during Lent historically gave up more than just meat dishes – eggs, milk, and even fat were abandoned. According to the ancient tradition, 33 pastry layers were used (like Jesus’ age at his passing), while the eggs represented life, fertility and renewal. The ingredients (spinach, cheese, eggs and pastry) were something special, a celebration of the Easter feast. Nowadays the recipe calls for a fewer layers of pastry, and artichokes sometimes substitute spinach. Torta Pasqualina is an absolute hit for everybody who eats it – even kids like it! The perfect combination of spinach, sautéed onions and creamy ricotta cheese is its secret while the hidden eggs add a special surprise.

TORTA PASQUALINA (EASTER PIE)
Preparation time: 1 h           Baking time: 40 min.       Servings: 6

Torta Pasqualina small

INGREDIENTS
1 kg (about 2 pounds) fresh spinach leaves
4 tablespoons olive oil (Extra Virgin)
1 medium onions, finely sliced
1 sprig fresh marjoram
500 g (2 cups) ricotta cheese
1 egg + 6 hard boiled eggs
100 g (1 cup) grated Parmesan
460 g – 2 sheets (1 pound) puff pastry
Salt , nutmeg and freshly ground pepper

DIRECTIONS
Preheat the oven to 170°C -180 °C (350 °F)
1.Boil 6 eggs and shell them. Set aside
2. Wash the spinach several times to remove all the soil. Drain well then steam for 3-4 minutes. Cool, drain and squeeze dry
3. In a large skillet on medium-low heat sauté the onion with olive oil until onion is soft and translucent. Add the spinach and mix well with the onion. Cook for about 1-2 minutes. Season with salt and marjoram
4. In a large bowl cream one fresh egg with the ricotta cheese and Parmesan. Add the vegetable mix and season with freshly ground pepper and nutmeg. Set aside
5. Place one puff pastry sheet in a 25 cm (10 in) baking dish and prick the pastry bottom with the tines of a fork (four or five times is sufficient). Fill with half of the vegetable mix. Hollow out 6 depressions in the filling with the back of moist spoon. Place the boiled eggs in them and pour in the rest of the vegetable mix. Cover with the second sheet
6. Bake until golden, about 40 minutes. It is delicious when eaten freshly baked and a little bit warm, but it is also a treat to enjoy cold the next day.

Note: You can substitute spinach with new Swiss chard. You can store the pie in an airtight container in the refrigerator for 3 days. You can also freeze it after cooking. I would suggest to cut into slices and freeze each single slice. Before serving, defrost in the fridge and heat it in the oven.  -Paola