Archive | Sweets and snacks RSS feed for this section

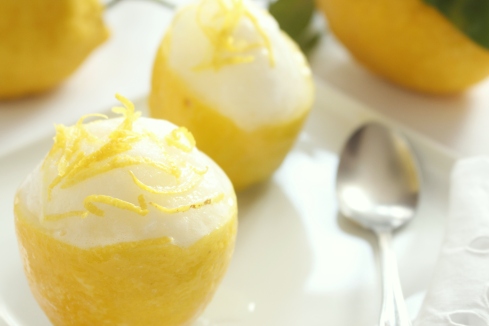
Sorbetto al Limone (Lemon Sorbet)

28 Jun

This is a perfect summer treat, refreshing and beautifully light. You can serve it either as a dessert or as a palate cleanser between meals. Sorbet traces back its origins from the Chinese in the VII A.C. The Greeks thought it was a nectar of the Gods, the Romans loved it, and still in the 21th century we are enjoying it!

Sorbet, also known in English as sherbet, is a frozen dessert prepared with sugar syrup flavored with any type of different fragrant fruit juices, fresh herbs (basil, mint for example), wine (champagne) and liqueur. The preparation is very easy and fast, the longer time is due to the freezing period. I would suggest to prepare it one day in advance and store it in the freezer. Sorbet should have a soft and smooth texture, so I add natural stabilizers to the recipe such carob seed flour and beaten egg white instead of chemicals and milk products like the mass production industry does. Carob seed flour is a natural thickening agent, rich with fibers, minerals and protein. Egg white is rich in protein too. They improve texture decreasing the freezing point.

Lemon sorbet is my favorite flavor, delicate and digestive. I love it as a dessert because it is something sweet to enjoy but at the same time light. I don’t feel guilty after eating it!

SORBETTO AL LIMONE (LEMON SORBET)
Preparation time: 50 min Cooling time: 8 hrs Servings: 10 people

Sorbetto limone

INGREDIENTS
950 l (4 cups) water
650 g (3 cups+4 teaspoons) sugar
10 organic lemon, filtered lemon juice
2 organic lemon, zest
6 g (1 heaping teaspoon) carob seed flour
2 pasteurized egg whites, lightly whisked
10 organic lemons with thick rind, to prepare the shells
Lemon rind, shredded

DIRECTIONS
1. Cool a steel bowl in the freezer for 30 min.
2. In a saucepan combine 630 g (3 cups) sugar and water, bring to boil over medium heat. Cook for 5 minutes, stirring continuously, until sugar is dissolved and mixture starts to simmer. Add lemon zest. Remove from heat and cool completely. Filter out the zest from the sugar syrup
3. While syrup is cooling, prepare lemon shells. Cut off the top 1/3 of the lemon. Hollow out each lemon by using a grapefruit knife just inside the rind, circling the flesh. Remove juice and flesh with a spoon. If you have a fruit maker, you can use the pulp to prepare lemon juice. Make a slight shallow cut on the bottom of each lemon shells (being careful not to cut through to the inside of the lemon). This procedure will prevent it falling over when you serve it. Wrap shells in aluminium foil and store in the freezer. The frozen shell will prevent the sorbet from melting too quickly when you eat it
4. Mix 20 g (4 teaspoons) sugar and carob seed flour in a small bowl. Add ½ cup sugar syrup and mix with a whisk. Beat egg white in a separate bowl with an electric whisk
5. Pour the sugar syrup into the chilled bowl and stir in lemon juice and carob seed mixture. Add egg white and mix well. You can expect the egg white to separate somewhat from the lemon juice. That’s normal
6. For the final step, you can choose from two different methods: ice cream maker or freezer method. Ice cream method: Pour the mixture into ice cream maker and follow the instructions. Freezer method: Pour the mixture in a suitable container and store in the freezer for one hour. Remove and mix with a fork. Put in the freezer for at least three hours. Remove from the freezer, stir and put back in the freezer for another three- four hours. At this point, the sorbet should be ready. To give the sorbet a creamier texture, pop it in a blender for just a few seconds and then fill the lemon shells and freeze again for about 20 minutes. Decorate with shredded lemon rind. You can also let it thaw a little bit and serve in a flute with a straw.

Note: You can store the sorbet in the freezer for 3-4 days. -Paola

Torta di Riso (Rice Cake)

31 May

A light and delicious cake, perfect for a gluten-free diet.
The rice cake is an Italian classic, prepared with some variations in the different regions of Italy The recipe that I am proposing is typical of Emilia Romagna; in the past it used to be prepared only at Easter, but nowadays we eat it all year long. It is too tasty for just one occasion! Actually I like it as a summer dessert because of its fresh lemon taste. The simple recipe with milk and rice can feature a variety of different other ingredients, according to your personal tastes (see note). The rice I use is the Arborio or Carnaroli rice, rich in starch, that gives a smooth texture to this dessert. The traditional recipe calls for some butter (about 3 tablespoons); I omit it to make the recipe lighter. You can serve it as a dessert after dinner, or I also like it as an afternoon snack with a good cup of coffee.

TORTA DI RISO (RICE CAKE)
Preparation time: 1 hour      Cooking time: 45 min.     Servings: 6

Torta riso fetta

INGREDIENTS
950 ml (4 cups) whole milk
200 g (7 oz) Arborio rice
1 vanilla bean
70 g (½ cup) blanched almonds, coarsely chopped
100 g (2/3 cup) raisins
1 lemon, grated rind
130 g (1/3 cup) sugar
3 medium eggs
1 pinch of salt
Rum
Powdered sugar for decoration

DIRECTIONS
Preheat oven to 160 °C.
1. In a small bowl soften the raisins in the rum for about 10-15 min. The amount of rum should be enough to fully cover the raisins
2. Bring the milk to a boil with the vanilla bean. Then remove the vanilla and add the rice. Cook over medium-low heat for 30 minutes or more, until the mixture is similar to a “risotto” (pretty dense mixture). Stir often with a wooden spoon. Pour the mixture into a glass bowl and allow to cool
3. As soon as the “risotto ” is cold, add the raisins and rum, almonds, salt and lemon zest
4. In a bowl beat the eggs with the sugar using an electric mixer until creamy. Add the rice mixture and stir. The batter should be pretty liquid
5. Coat the bottom of a spring form pan (diameter 18 cm, 7 inch) with a disc of baking paper and pour in the mixture. Bake for about 45 minutes, until the surface is golden and a knife inserted in the middle comes out clean. Allow to cool on a rack. As soon as the cake is cool, loosen the cake from the pan by running the blade of a knife around the edges, and then release it. Remove the baking paper. Place on a serving plate and enjoy!

Note: The almonds can be replaced with an equal amount of pine nuts. You can also add 50 g of dried apricots, cut into small pieces. Vanilla can be replaced with a pinch of ground cinnamon. Some recipes use fresh fruit such as pitted cherries. Paola

Mascarpone Fatto in Casa (Homemade Mascarpone Cheese)

2 May

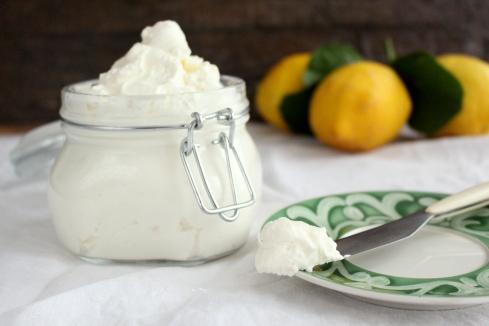
I bet that you have tried tiramisù at least once in an Italian restaurant, that creamy Italian dessert made with a magic ingredient: mascarpone cheese. Today I will share a little secret with you: how to make mascarpone at home! Making cheese can certainly seem difficult, but preparing mascarpone is very easy -it only requires ten minutes of your time and just two ingredients: cream and freshly-squeezed lemon juice. What you really need is patience for the cooling time in the refrigerator, that’s it. The smooth texture and the mouthwatering taste of fresh homemade mascarpone can’t be compared to one you buy, and I doubt you will ever buy it again. In Italy we use mascarpone for both savory recipes (for example, datteri ripieni con mascarpone e noci), as well as pies and sweet recipes (panettone con crema al mascarpone, pandoro alla crema di limoncello). Mascarpone originated in my region of Lombardy, probably in the 16th or early 17th century. Nowadays it is recognized as a prodotto agroalimentare tradizionale (tradtional food product).

MASCARPONE FATTO IN CASA (HOMEMADE MASCARPONE CHEESE)
Preparation time: 9 hrs                       Yield: 300 g (1 ½ cups, or 11 oz)

Mascarpone


INGREDIENTS
500 ml (2 cups) cream (not ultra-pasteurized)
7.5 ml (½ tablespoon) freshly-squeezed lemon juice

DIRECTIONS
1. In a medium saucepan, heat cream on a medium low flame, stirring constantly with a whisk until it reaches the temperature of 85°C (185°F)
2. Very slowly add the lemon juice stir and continue to cook until the cream thickens to coat the back of a spoon (about 8-10 min). Remove from the heat and let it cool at room temperature for about 35 min.
3. Line a colander with a cheese cloth and place it on top of a bowl. Pour in the cream, scraping the pan with a spatula, and let it cool completely
4. Cover with plastic wrap and let it rest in the fridge for at least 7-8 hours. If I have to use mascarpone for my tiramisù, I usually check it after 7 hrs because I prefer it very creamy. The texture of tiramisù is smooth. The more you live it the fridge the more dense it becomes
5. Transfer mascarpone to an airtight container. It can be stored in the fridge for about 3-4 days. Mascarpone is good fresh.
Note: The refrigeration temperature and time are critical. It should be 4°C (39°F), and the longer you leave it in the fridge the thicker it becomes. The mascarpone consistency is like the Philadelphia cheese. The quantity of lemon juice is usually 7.5 ml (½ tablespoon) per 500 ml (2 cups) of cream, but the quantity of citric acid in each lemon can vary a little bit. If the cream does not start to thicken after 5-7 min. of cooking, you can add a few more drops of lemon juice. Paola

Quote

Mini Cassata Siciliana (Mini Sicilian Cassata)

13 Apr

This year I will celebrate Easter with cassata, a delicious, tempting and colorful cake. Cassata is a typical dessert of the Sicilian pastry, in particular of Palermo. In the past it was enjoyed exclusively to celebrate Easter after the long period of Lent: a well-deserved award! Today it is enjoyed throughout the year.

The preparation is not particularly difficult as far as the cake it is concerned, whereas the decoration can be sumptuous and baroque, requiring some ability. The version that I propose is quite easy, also good for less experienced cooks. The ingredients are simple: ricotta cheese, dark chocolate and candied fruit. All these ingredients are mixed with sugar and used as a filling between two discs of sponge cake covered with colored marzipan and decorated to taste.

This recipe, like other Sicilian ones, was influenced by the Arabic domination. The name, in fact, derives from the Arabic “Quas’at”, which means round bowl. In fact, the shape looks like a bowl. The mini cassata is an alternative to cassata, elegant to serve and tasty to eat. Happy Easter all my beloved readers! Buona Pasqua a tutti!

MINI SICILIAN CASSATA
Preparation time: 2 hrs                        Servings: 6 people

Cassatta fetta

INGREDIENTS
450 g (16 oz) sponge cake, sliced 1 cm (½ inch) thick and cut into 12 discs 8 cm (3 inch) diameter with a cookie cutter
600 g (21 oz) ricotta cheese
160 g (2 cups) powdered sugar
150 g (5 oz) dark chocolate, cut into small cubes
150 g (5 oz) candied fruit, cut into small cubes
28 g (1 oz) peeled pistachios, cut into pieces
White Marsala wine
450 g (16 oz) almond paste
Green food coloring
White icing
Candied fruits for decoration

DIRECTIONS
1. In a large bowl whisk sugar with ricotta. Add chocolate, candied fruits and pistachios
2. Line the base and the sides of 8 cm (3 inch) diameter and about 10 cm (4 inch) height bowl with parchment paper. This process will help remove the cassata from the bowl. Place a disc of sponge cake sprinkled with Marsala wine, pour in some of the filling (almost to the top) and cover with another disc of sponge cake sprinkled with Marsala. Cover the surface of the cake with some parchment paper and store in the fridge for about one and a half hours
3. Knead the almond paste on a working surface sprinkled with powdered sugar, mixing in the dye until you get the your favorite shade of Easter green. Roll out a disc of marzipan to cover the entire mini cassata, including the sides, to a thickness of 4-5 mm.
4. Take out from the the refrigerator, remove from the bowl and flip over onto a serving plate
5. Place almond paste on top to cover the entire surface. Decorate as desired. I decorated it very simply with some white icing and candied fruits. You can use your creativity to make it fancy.

Note: You can use this recipe to prepare just one cassata with a disc (25 cm, 10 inch) diameter. The amount of almond paste is 280 g (10 oz). Paola

Tortelli di Carnevale (Carnival Fritters)

24 Feb

Let’s party! It is Carnival! Carnival, well-known in the USA for the Mardi Gras celebrations, is one of the most joyous holiday of the year. We cannot refrain from masked balls, parades and street parties. This festive event is also celebrated with special treats prepared only during this season, for example tortelli (or castagnole, bugie, zeppe… whatever you like to call them). There are a lot of names for the same delicious fritters, loved by children and adults. I remember my grandmother preparing tortelli as well as chiacchiere, another Carneval treat! This event was part of our annual Carnival celebration. Toertelli are typically of Lombardy (my region) and can be enjoyed plain or, if you want to make them even more delicious, with chocolate cream or custard. The dough is smooth but not liquid and, when dropped in hot oil, swells to form lovely little puffs.

TORTELLI DI CARNEVALE (CARNIVAL FRITTERS)
Preparation time : 20 min. Cooking time: 20 min. Servings: 30 tortelli

Frittelle di Carnevale

INGREDIENTS
250 ml ( about 1 cup) milk
60 g (2.15 oz) butter, cut into cubes
50 g (¼ cup) granulated sugar
1 lemon, grated zest
1 pinch of salt
160 g (1 cup) all-purpose flour
7 g (½ teaspoon ) baking powder
4 eggs
Peanut Oil
Chocolate cream (like Nutella)
Cocoa powder

DIRECTIONS
1. Sift the flour with the baking powder. Set aside
2. Pour the milk into a medium saucepan and add the butter, sugar, lemon zest and salt. Bring to a boil over medium heat, stirring with a wooden spoon. Remove from heat after 1 minute
3. Add the flour and baking powder, stirring energetically until the mixture is compact. Put on heat (medium-low) and cook for about 2 minutes. The dough should be a compact ball
4. Pour it in a bowl and let cool
5. Add the eggs one at a time with an electric whisk until the batter is smooth but not liquid
6. In a pan heat the frying oil to 170°C-340°F. If you do not have a thermometer, use this simple method. Place a cube of bread in the oil (approximately 2.5 cm). If it turns brown after 60 seconds, the oil is ready for frying. Slide a spoonful of batter (size of walnut) in the oil with the aid of another spoon. Wait until it is puffy and golden brown, then turn it over. It will take 4-5 minutes to cook tortelli perfectly
7. Remove from the oil with a slotted spoon and place on paper towels to absorb excess oil. Allow to cool. Fill with chocolate cream using a patisserie syringe. Roll in granulated sugar and sprinkle with cocoa powder.

Note: Frying is a dry heat cooking method …read more in the Chiacchiere post. Paola

Torta Gianduia con Ciliege (Gianduia Cake with Cherries)

10 Feb

Love and sweetness together? Yes it is possible with my gianduia cake prepared with chocolate and hazelnuts and then covered with a cherry topping. Chocolate is seductive and slightly mysterious; it has been called the food of the devil. Chocolate and love result in the same good feelings and sensations in the brain. Therefore, this delicious and tasty cake is perfect to serve as dessert for the most intimate dinner of the year, Valentine’s Day! Gianduia is a specialty of Piedmont, and it is made with ground hazelnuts and chocolate. The combination of these flavors makes an irresistible treat. I also recommend gianduiotti, the pralines made with the same mixture. The colorful and fruity addition of cherry topping gives a moist texture to this cake. You can certainly impress your partner on such a special day, an experience for all senses! Happy Valentine’s Day to all of my beloved readers.

TORTA GIANDUIA CON CILIEGE GIANDUIA CAKE WITH CHERRIES)
Preparation time: 1 h Cooking time: 50 min. Servings: 8

Torta Gianduia fetta

INGREDIENTS
Cake
260 g (1 ¼ cups) granulated sugar
3 whole eggs
1 teaspoon vanilla extract
150 g (5 oz) melted butter
140 g (1 ¼ cups) ground hazelnut
240 g (1 2/4 cups) all-purpose flour
2 tablespoons cocoa powder
15 g (3 teaspoons) baking powder
150 g (5 oz) dark chocolate (70%)
170 ml (¾ cup) buttermilk at room temperature
2 tablespoons rum
1 pinch salt

Topping
450 g (1 pound) canned, pitted cherries
1 lemon (juice)
6 tablespoon sugar
1 ½ tablespoon potato starch
300 ml (1 ¼ cups) cherry juice

DIRECTIONS
1. Preheat oven to 170°C (350°F)
2. Put the hazelnuts in a food processor and process until finely ground. Set aside
3. In a large bowl mix the flour, baking powder, salt, cacao powder, ground hazelnuts
4.Beat the eggs and the sugar with an electric whisk for at least 5 min. until pale and creamy. Stir in the melted butter and vanilla extract until thoroughly combined
5. In a double boiler melt chocolate. Cool for about 2 minutes stirring continously and slowly add buttermilk
6. Combine the egg mixture with the flour mixture, then add the chocolate mix and rum. Mix with an electric whisk until creamy
7. Generously butter a 25 cm (10 inch) spring-form cake pan. Sprinkle with flour to cover the entire surface, removing any excess flour
8. Bake for 40-45 min. or until done. Test by inserting a wooden toothpick into the middle of the cake. If it is done, it should come out dry
9. Let cool on a wire rack for 10 min. Remove from the pan and let cool completely on a wire rack
10. In the meantime prepare the topping. In a saucepan dissolve sugar and potato starch into the cherry juice. Mix with a whisk until smooth. Add the lemon juice and the cherries. Over a medium low heat bring to boil. Cook for 4- 5 min. stirring slowly until thick. Let cool and spread over the cake. -Paola


Torta ai Semi di Papavero e Mele (Poppy Seeds and Apple Cake)

21 Jan

Have you ever tried a butter-less, gluten free cake? I ate this delicious cake for the first time in South Tyrol. I was immediately struck by the delicate taste, in addition to the absence of butter and wheat flour in the recipe. The butter is replaced by poppy seeds, and wheat flour by gluten -free almond flour, but rich in protein, fats, vitamins and minerals. The cake with poppy seeds and apples is a typical German dessert, but also enjoyed in Trentino Alto Adige, a region in the north of Italy that was part of Austria until the beginning of the last century. The recipe is simple and includes eggs, sugar, poppy seeds and grated apples. After slow cooking in the oven, the cake is decorated with marmalade and toasted almond slices on the side. In fact, the poppy seeds blend very well with the citrus flavor, a real treat!
Poppy seeds are used mainly in bakery and confectionery, but we should not confuse the seeds with seed pod and straw. The seeds contain very low levels of opiates. The seeds are really healthy because they are rich in linoleic acid, omega 6, vitamins (vitamin E ) and minerals. They are used to treat anxiety and stress and, in fact, have a mild sedative and calming effect. You can enjoy this inviting and elegant dessert after dinner or in the afternoon with a good cup of tea or coffee.

TORTA AI SEMI DI PAPAVERO E MELE (POPPY SEEDS AND APPLE CAKE)
Preparation time: 1 h        Cooking time: 50 min.            Servings: 8

Torta ai Semi di Papavero

INGREDIENTS
200 g (1 scarse cup) granulated sugar
6 whole eggs
200 g (1 ¼ cups) ground and toasted almond flour
3 grated apples
200 g (1 cup) poppy seeds
1 teaspoon vanilla
50 ml (¼ cup) rum
350 g (about 1 cup) orange marmalade (puree)
120 g (1 cup) toasted almond flakes
1 slice of candied orange

DIRECTIONS

1. Preheat oven to 160 ° C.
2. In a non-stick skillet over low heat toast the almond flour for 4-5 min., stirring with a wooden spoon. Allow to cool and set aside
3. In a large bowl, beat the eggs and sugar with an electric mixer until mixture is fluffy. Add ingredients in the order according to the list above. Stir with a wooden spoon, and not with an electric whisk, to prevent overheating of the poppy seeds
4. Coat the bottom of the spring form pan (25 cm in diameter) with baking paper previously wet under running water and wrung out. Pour the batter into the pan
5. Bake for approx. 50-60 min.
6. In the mean time in a nonstick pan toast the almond flakes with a teaspoon of sugar. Cool and set aside
7. Allow the cake to cool on a rack. Remove from the pan, cover with orange marmalade and decorate the sides with the toasted almond flakes. At the center of the cake you can place a slice of candy orange peel to give a touch of color. Paola

Pandoro con Crema di Limoncello (Pandoro with Limoncello Cream)

22 Dec

This year Passion and Cooking will celebrate Christmas with Pandoro, the “golden cake”! Pandoro and panettone are the most popular sweets during the winter holidays. While panettone is a native of Milan, pandoro is from Verona. It is traditionally shaped like a frustum with an 8 pointed-star section and is served dusted with powdered sugar (my kids like to be the ones to put on the sugar). The dough is very soft and the taste is delicate and refined. Pandoro can be traced back to the 18th century to the rich Venetian aristocracy. Although some people recognize the similarity with the French brioche or with the ” Pan di Vienna”, pandoro seems to have been first produced on October 14, 1894, when Mr. Melegatti obtained the patent for a procedure to be applied in producing pandoro industrially. From this moment on, and considering the similarity with the Nadalin (a typical sweet from Verona), Verona is now universally recognized as the home of the original pandoro.The preparation technique is quite complex, so I suggest buying a good pandoro and enjoying it with a delicious homemade cream. I love the combination of citrus and soft sweets such as panettone and pandoro, so I propose this fresh and aromatic Limoncello cream, made with the legendary Limoncello of Sorrento, milk, cream, sugar and mascarpone cheese, the king of cream cheese!  In a few minutes you will have a delicious and rich cream to garnish your slice of pandoro. A helpful tip is to gently heat the cake for about 15-20 min. (for example on a steam radiator) and to sprinkle with powdered sugar to get the snow effect before serving. Wishing you all a delicious Christmas!

PANDORO WITH CREAM LIMONCELLO
Preparation time: 10 minutes            Servings:  10

Pandoro con crema

INGREDIENTS
500 g  (about 1 pound) fresh mascarpone
80 ml (1/3 cup) Limoncello liquor
40 ml  (1/8 cup + 2 tsp) milk
40 ml fresh  (1/8 cup + 2 tsp) cream
50 g (1/4 cup) granulated sugar
1 teaspoon finely grated lemon zest

DIRECTIONS
1. In a medium saucepan heat milk, cream and sugar for 1-2 minutes until sugar dissolves. Cool completely, add Limocello and lemon zest. Set aside the Limoncello cream .

2. In a medium bowl with an electric mixer whip the mascarpone, incorporate approximately 100-120 ml of Limoncello cream, adding one spoon at the times. Whisk for a few seconds until the mixture is creamy. -Paola

Torta di Zucca (Pumpkin Pie)

27 Nov

Pumpkin pie, or torta di zucca, is a typical American dessert, often prepared to celebrate Thanksgiving. When I first ate it in the US, I thought how I might add a bit of Italy to this recipe. The recipe I propose is my creation, with some additional, typically Italian ingredients in the filling, such as amaretti and amaretto di Saronno liquor, while the crust is prepared with pasta brisee instead of American pie dough. The taste of amaretti goes very well with that of the pumpkin making this dessert doubly delicious (I also use this combination of ingredients with pasta, in the pasta con zucca e amaretti recipe. Pumpkin pie is traditionally served with sweetened whipped cream, but I personally prefer to eat it plain, to fully enjoy the pumpkin’s distinctive flavor. Every time I serve it, it’s really a big success, something a bit different to savor.

TORTA DI ZUCCA (PUMPKIN PIE)
Preparation time: 1h+15min.      Cooking time: 45 min.      Servings: 8
Torta-di-Zucca

INGREDIENTS
Pasta Briseè (Briseè crust)
250 g  (1 ½ cups) all-purpose flour
120 g (¼ cup) chilled butter
1 egg yolk
¼ teaspoon salt
60 ml cold water

Filling
450 g (1 heaping cup) mushed pumpkin
250 ml (1 heaping cup) fresh cream
50 g (¼ cup) brown sugar
100 g (½ cup) white sugar
10 amaretti cookies, finely crushed
100 ml  (½ cup) Amaretto di Saronno liquor
1 teaspoon cinnamon
¼ teaspoon nutmeg
1/8  teaspoon cloves
2 slightly beaten eggs

DIRECTIONS
Preheat the oven to 190°C (425°F)
1. Pasta brisee (brisee crust). In a large bowl, combine flour and salt. Cut in the butter until mixture resembles coarse crumbs. Stir in water, a tablespoon at a time.  Add the egg yolk until mixture forms a ball. Wrap in plastic and refrigerate for at least 30 minutes
2. Filling. To cook pumpkin see risotto di zucca. In a large bowl mix until well blended pumpkin, cream, brown sugar, white sugar, amaretti cookies, Amaretto liqueur, spices and eggs
3. Once the dough has rested, flatten it out on a lightly floured board, then transfer to a 25 cm (9 in) ceramic or glass pie or tart baking dish.  Gently pat the pastry dough in the pan to 4 mm (less than ¼ in) thickness, to line the bottom and sides.  The edge should have a slightly thicker layer of pastry than the bottom, about 5 mm. Prick the pastry bottom with the tines of a fork (four or five times is sufficient)
4. Pour the mixture into the pie shell. Bake for 15 min. at 190°C (425°F), then reduce the temperature to 170°C (350°F), bake about 30-35 min. longer until an inserted knife comes out clean
5. Cool on a racket and serve with sweetened whipped cream .  -Paola

Miascia, Lake Como Cake

3 Nov

Today I would like to present miascia (mee-AH-sha), a typical cake from my beautiful home, Lake Como. It is one of the traditional peasants’ sweets prepared with stale bread (“pan poss” in the local dialect) with the addition of dried and fresh fruit. Most of the farmers’ cakes are prepared with dried fruit or fresh fruit (both in this recipe) to compensate the lack of sugar that, in the past, was very common among the less well off. The fruit actually adds minerals and vitamins that sugar doesn’t have, making this cake also nutritious. In the past miascia could even replace a full meal or be served on very special occasions such as parties or celebrations. Today it is enjoyed as a great dessert accompanied by a fortified wine or vanilla ice cream. It is also a tasty snack, going well with a glass of milk or a cup of coffee.

MIASCIA, LAKE COMO CAKE
Preparation time: 2 hrs +40 min.    Cooking time: 45 min.  Servings : 8

Miascia fetta

INGREDIENTS
500 g (18 oz) stale bread
15 amaretti cookies, crushed
500 ml (about 2 cups) whole milk
120 ml (½ cup) Amaretto di Saronno liqueur
50 g (⅓  cup) toasted pine nuts
150 g (about 1 cup) raisins
2 eggs
70 g (⅓  cup) sugar
2 apples
2 pears
1 lemon, grated rind
50 g (about ¼ cup) butter, melted
1 tablespoon flour 00

DIRECTIONS
1. Toast the pine nuts in a frying pan over low heat for a few minutes until golden brown. Cool and set aside
2. Cut the bread into small pieces and soak in a large bowl with milk and Amaretto liqueur. Let stand for about 2 hours. Add more milk if the bread is not soaked enough. The amount of milk depends on the type of bread used and how stale it is
3. Preheat oven to 190°C – 350°F
4 . Cut apples and pears into thin slices and add to the bread with the remaining ingredients (pine nuts, amaretti, raisins, eggs, sugar, lemon peel, butter and flour). Mix all ingredients together well
5. Wet and wring out some baking paper and line a baking pan (25 cm diameter, 10 inch) with it to make prevent the cake from sticking. Wetting the paper allows it to follow the sides of the pan better
6. Pour the batter into the pan and cook for 15 min. After this time, lower the temperature to 150°C and bake for an additional 30 minutes until golden.
7. Remove from oven and let cool on a rack for about 15 minutes. While your cake is still warm, sprinkle with powdered sugar and enjoy.

Note: There are a few variations of this classic recipe in which a small amount of corn flour (2 tablespoons ) is added . The type of bread used is very important both for the taste and the quantity of milk. You can also use whole wheat bread with cereals , as was used in the past.  In any case, the bread should be a hearty, baker’s bread, not an industrially-produced sliced bread. The result will be a very sweet, delicious and healthy treat! – Paola 


Cantucci

29 Sep

I bet that many of you have eaten Tuscan cantucci, the hard and crunchy, twice-baked cookies, at least once. They are often served as an after-dinner dessert to dunk in Vin Santo, a fortified sweet wine made with Trebbiano and Malvasia grapes. Cantucci are also called Prato cookies and are a masterpiece of traditional Tuscan confectionery. Cookies are made by cutting a roll of freshly baked dough diagonally, which is then put back in the oven for a few minutes to brown. The dough is simple and requires eggs, sugar, flour and almonds. My recipe also includes the addition of a tiny amount of butter and baking powder; these ingredients make the dough softer, so your cookies will be less dry and more crumbly. In my opinion the lack of fat in the traditional recipe makes the cookies too hard. The name cantucci derives from canto in Italian (corner) or cantellus, a Latin word meaning a slice of bread that the Roman soldiers consumed as part of their meal. But the real sweet cookies first appeared in the second half of the sixteenth century at the Medici court in Florence, though the recipe did not contain almonds. Some centuries later almonds were added, and then at the beginning of the 1900s production started on a large scale. Nowadays cantucci are enjoyed all over the world and are the emblem of Italian cuisine. They have only one defect: they are too good – one leads to another, and when you start it is hard to stop! They are a real temptation, resistance will be futile!

CANTUCCI
Preparation time: 30 minutes  Cooking time: 20 minutes Yield: 36 cookies

Cantucci
INGREDIENTS
220 g (1 ⅓ cups) blanched almonds
210 g (1 cup) sugar
2 eggs
50 g (about 4 tablespoons) unsalted butter, melted
300 g (scarce 2 cups) all-purpose flour
3 g (½ teaspoon) baking powder
pinch of salt

DIRECTIONS
Preheat oven to 180 ° C
1. Roast almonds for a few minutes in a nonstick skillet over medium-low heat. Cool, divide in half and set aside
2. In a large bowl mix dry ingredients such as flour, baking powder and salt. Set aside .
3. In a large bowl whisk together the sugar and eggs, then add butter. Stir in the dry ingredients and mix well. The dough should be homogeneous. Add almonds. Knead the dough on a floured work surface until you get a ball
4. Divide the dough into 4 equal parts and shape each one into a 18 cm (7 inch) roll about 6 cm (2.5 inch) wide and 3 cm (1.5 inch) high. Transfer each roll, using a spatula, onto a baking sheet lined with baking paper. Leave enough space to spread while cooking. Cook for 15 minutes
5. At this time, remove from the oven and cut diagonally into about 1-1.5 cm (½  inch) wide cookies. Bake again for about 5 min. Remove from oven and let cool on a rack . Eat when they are completely cold.

Note: Almonds can be replaced with equal amount of hazelnuts, pistachios, dried fruit such as figs (cut in small pieces) or chocolate chunks. Cantucci store well for several days in a cookie container . Paola

Crostata di Pesche Noci (Nectarin Tart)

14 Aug

The nectarine tart is a variation of a classic jam tart. It is a flavorful summertime dessert, prepared with pasta frolla and fresh nectarines (a type of peaches), which can be substituted with canned peaches during winter, but this will of course alter the tart’s taste and aroma! Peaches are, in fact, typical summer fruits, juicy and rich in water, therefore perfect for a summer diet! Peaches are highly satiating, keep hunger at bay for longer periods, so they are a good choice to incorporate into a weight-loss diet. The addition of a few crushed amaretti cookies gives a delicious flavor to this dessert. The almond taste of amaretti blends well with the sweet flavor and fragrant aroma of peaches. This peach tart is a perfect finale for any meal, from an casual picnic to a formal dinner.  It is delicious all by itself, but it can also be made even more enticing by adding a scoop of homemade gelato alla crema . In Italy we commonly enjoy these simple fruit tarts for breakfast or as a snack (with far fewer hydrogenated fats and processed sugars than industrially-produced breakfast foods and snacks), and they a true delight for kids and adults!


CROSTATA DI PESCHE NOCI (NECTARINE TART)
Preparation time: 1 ½ hrs   Baking time: 35-40 minutes  Servings: 6-8

Crostata di Pesche

INGREDIENTS
Pasta frolla (see basic recipe pasta frolla )
3 large nectarines
100 g (1 cup) crushed amaretti
4 tablespoons sugar
Juice of half a lemon

DIRECTIONS
Preheat oven to 170°C-180°C
Prepare the pastry according to the basic recipe
1.While the pasta frolla is resting, wash the peaches under running water. Cut into slices with a thickness of 5 mm (2 inch). In a large bowl mix peaches, sugar and lemon juice, taking care not to break the peaches. Set aside
2. Coarsely crush the amaretti cookies. Set aside
5. Once the dough has rested, roll the dough (4-5 mm thick, 2 inch) to cover the bottom of a ceramic baking dish, 25 cm (10 inch) in diameter. The dough around the edge should be slightly thicker, about 5-6 mm (2 inch). Prick bottom of dough with the tines of a fork (four or five times is enough). Sprinkle the crushed amaretti cookies evenly over the dough and cover with peaches in a circular pattern or as you prefer
6. Bake the tart until golden brown, about 35-40 minutes. Let cool on a rack.  It is good fresh, but you can also enjoy it next day if stored in a ventilated container for sweets.

Note: Nectarines are smooth-skinned peaches. When you buy them, make sure that they are ripe: soft to the touch (but not mushy), fragrant and with an intense color. Paola

Granita al Caffé (Iced Coffee)

22 Jul

The granita al caffè is a typical summer Sicilian breakfast, particularly in the Messina area. It is cool and sweet, made with water, sugar and coffee. It can be enjoyed with fresh, crusty bread or with the classic tuppu brioche, an Italian breakfast bread with a spherical ball of dough on top. Coffee granita is commonly served with whipped cream – what a delight! Its origins are ancient and go back to the time of the Arab domination. In the past granita was prepared in Sicily using winter snow gathered from the mountains and then stored throughout the year in special caves. The resulting ice was scraped and served with fruit syrup! In fact, even today the most traditional granita recipes are made by repeatedly scraping the surface of the ice. Over time this type of preparation based on snow changed to the modern granita made with an ice cream maker. The classic flavors are lemon, strawberry, almond and, naturally, coffee! The industrial recipes include gelling agents to increase the creaminess and to keep it from melting, but this is really a true homemaker’s recipe, just as my mother and my grandmother made it without using an ice cream maker and, of course, including the typical “scratch”!

GRANITA AL CAFFÈ (ICED COFFEE)
Preparation time: 18 min.       Cooling time: 4 hours        Servings: 2

Granita al Caff

INGREDIENTS
70 g (⅓ cup) sugar
180 ml (¾ cup) water
300 ml (1 ¼ cup) espresso
180 ml (¾ cup) fresh cream
2 tablespoons powdered sugar

DIRECTIONS
1. Prepare the espresso coffee and let cool completely
2. In a saucepan over low heat melt the sugar with water, bring to a boil and cook for 1 minute until you obtain a syrup. Turn off the heat and allow to cool
3. Combine coffee with syrup and mix well. If you have an ice cream maker, pour in the mixture and follow the instructions. Otherwise pour it into a metal container (steel) or glass (Pyrex), because they are good conductors, and store in the freezer for two hours. Remove from the freezer and mix with a spoon to prevent solidification into ice. Repeat this procedure every 40 minutes for about 2 more hours
4. Whip the cream with powdered sugar
5. Scrape the granita with a spoon into a small glass and top with whipped cream.

Note: The amount of sugar used can be varied to reach your desired level of sweetness; taste is very personal.
Paola

Gelato alla Fragola (Strawberry Ice Cream)

12 Jul

Some say that strawberry ice cream is the most popular of fruit-flavored ice creams: fresh, flavorful and a perfect food to make desserts delicious and colorful. The main ingredient can be fresh cream only,  or a blend of cream and yogurt, which is certainly lighter. The use of fresh strawberries makes your gelato tastier and more fragrant, but if fresh strawberries are not available, you can use frozen ones. Strawberry ice cream usually attracts children’s attention because of its intense color and aroma. Homemade strawberry ice cream is a nutritious snack, rich in vitamins, to serve to your children.

STRAWBERRY ICE CREAM
Preparation time: 18 min.      Cooling time: 4 hours     Servings: 4

Gelato alle Fragole
INGREDIENTS
60 g (scant ⅓ cup) granulated sugar
6 tablespoons water
280 g (10 oz) strawberries
300 ml (1 ¼ cups) fresh cream
70 g (scant 1 cup) powdered sugar

PROCEDURE
1. In a saucepan over low heat dissolve granulated sugar in water.  Cook for a few minutes until sugar is dissolved and syrup prepared. Turn off the heat and allow to cool completely
2. In a food processor, blend the strawberries and pass through a sieve to remove seeds
3. Mix the strawberry puree to obtain a syrup. Set aside
4. If you have an ice cream maker, pour in the strawberry puree, cream and powdered sugar, and follow the instructions. Otherwise, whip the cream with powdered sugar.
Fold together strawberry puree with the whipped cream, stirring gently with a spatula
6. Place in a suitable container and freeze for at least four hours.

Note:  You can substitute half of the amount of cream with whole milk yogurt. This  recipe makes your ice cream lighter and of course with fewer calories. – Paola

Gelato alla Crema (Vanillia Ice Cream)

8 Jul

Craving ice cream, the freezing and formless – but tasty and delicious nectar? Here is the homemade Italian gelato recipe!  Summer has finally arrived and it is time to fully enjoy gelato, Italian ice cream, the king of the summer season, sweet and refreshing!  Everybody knows ice cream, but few probably know that long ago, ancient civilizations served ice for cold foods for thousands of years. The Arabs were the first to use milk as a major ingredient in the IX century. Ice cream, derived from iced-cream, is a frozen dessert usually made from dairy products and sugar, and often with fruits or other flavorful  ingredients.  So why not prepare this tasty treat at home? Homemade ice cream is easier than you think; it is genuine and healthy, because it is chemical-free,  as well as nutritious – both adults and children love it.  Recent studies show that ice cream can affect  your mood, helping you relax and sleeping better (but I think we all already knew that it just makes us happy!).  Vanilla ice cream is perhaps the most versatile and easy one to make. Its preparation requires a few common ingredients such as milk, cream, eggs, sugar and vanilla. It can accompany fruit or cake, be used in a delicious affogato al caffé (meaning ice cream “drowned in coffee”), eaten with berries or plain delicious just by itself!

GELATO (ICE CREAM)
Preparation time: 15 min.     Chilling time: 6 hours       Servings: 4

Gelato alla crema_2
INGREDIENTS
200 ml (scant cup) whole milk
200 ml (scant cup) fresh cream
80 g (scant ½ cup) sugar
2 egg yolks
1 vanilla bean, split and scraped

PROCEDURE
1. In a saucepan over low heat melt the sugar with the milk and cream. Add the vanilla bean. Measure the temperature with a cooking  thermometer. It should not exceed 85 °C (185 °F) otherwise when you add the egg yolks, they  will coagulate
2. When the mixture reaches the right temperature, add the egg yolks and mix well with a whisk. Cook in a bain marie for 5 minutes. Remove from heat
3. Pour the cream mixture into a bowl. To lower the temperature more quickly, put the bowl in a larger bowl filled with ice and stir continuously
4. If you have an ice cream maker pour the mixture into ice cream maker and follow the instructions
5. If you do not have an ice cream maker, pour the mixture in a suitable container and store in the freezer for at least three hours. Remove from the freezer, stir and put back in the freezer for another three hours. At this point, the ice cream is ready. To give it a creamier texture blend for a few seconds and then put in the freezer for about 10 minutes. -Paola

Torta di Fragole (Strawberry Tart)

4 May

This delicious and fresh strawberry tart is prepared with an almond-flavored dough (pasta frolla), filled with custard and then decorated with fresh strawberries for a tasty and colorful touch. It is a water-mouthing dessert to serve on a special occasion such as the Mother’s Day! But this is a classic for any other occasion too, such as a birthday party or a dinner with friends. The preparation of this tart is not difficult, but it requires a bit of patience and some creativity in decorating. The look and the taste are worth it! May  12th will be Mother’s Day in most countries, and we like to celebrate this special day by preparing something special. Mother’s Day actually has pagan origins and dates back to ancient times. Even the Greeks and the Romans dedicated one day each year to their parent. In Italy the first celebration was in Assisi in 1957, and since then it has been in our calendar on the second Sunday of May. This day is a very special day, all mothers should be surrounded by love, attention and gratitude, and of course delicious food!

TORTA DI FRAGOLE (STRAWBERRY TART)
Preparation time: 90 minutes           Crust cooking time: 40 minutes       Servings: 8

Torta fragole fetta

INGREDIENTS
Pasta Frolla
250 g flour (200 g 1 ¼  cups all purpose flour  + 50 g ⅓ cup potato starch)
100 g (⅔ cup) roasted almonds
8 g  (1 heaping teaspoon) baking powder
130 g  (⅔ cup) sugar
140 g (10 tablespoons) unsalted butter (at room temperature)
1 whole egg + 1 egg yolk
The grated rind of half a lemon
dried beans or other dried legumes (about 1 ½ cups)

Custard
500 ml (2 cups) whole milk
1 whole vanilla bean
6 egg yolks `
150 g (¾ cup) sugar
50 g (⅓ cup) potato starch
500 g (18 oz) fresh strawberries

Gelatin
230 ml (1 cup) water
20 ml (1 heaping tablespoon) lemon
4 tablespoons of sugar
1 packet of cake gelatin (like Tortagel)

DIRECTIONS
Preheat oven to 170 °C – 180 °C (350 °F)
1. Toast the almonds for a few minutes in a nonstick skillet over medium-low heat. Cool them and pulverize them in a food processor until you reach the consistence of flour
2. To prepare the pasta frolla (pie dough), mix the flour, almond flour, baking powder, sugar and lemon zest a medium size bowl. Cream the butter with an electric mixer in a separate bowl. Stir into the butter, the eggs and all dry ingredients. Knead the dough by hand until it forms a homogeneous ball. Remember to manipulate the dough as little as possible. Wrap the dough in plastic wrap and leave it to rest in the refrigerator for at least 30 minutes
3. While the dough is resting in a refrigerator, prepare the custard. In a large saucepan, place the vanilla bean in the milk and bring to boil. Remove from heat and let stand at room temperature for 10 minutes; remove the vanilla pod from the milk. In a bowl, beat the egg yolks and sugar with a whisk or an electric mixer until frothy. Mix in the starch a little bit at a time. Add 160 ml (⅔ cup) of the cooled milk stirring continuously with a whisk. Pour the egg mixture and the milk back into the saucepan with the remaining milk. Bring to boil, cook for 2 minutes, stirring frequently. Lower the heat (medium-low) and continue to beat with a whisk for 3-4 minutes until the mixture thickens. Turn off the heat and let it cool. Pour the cream into a glass bowl. To avoid formation of a “film” while the cream is cooling, lay a disk of plastic wrap directly on the surface
4. Once the dough has rested, on a lightly floured board, roll (or gently pat the pastry dough directly into the pan) the pastry dough to 6 mm (about ¼ in) thickness, to line the bottom and sides of a 24-25 cm (10 in) spring form pan.  The edge should have a slightly thicker layer of pastry than the bottom.  Prick the pastry bottom with the tines of a fork (four or five times is sufficient). Cover with a disk of baking paper of diameter slightly larger than the tart, fill with dried beans and cook for approx. 25 minutes. Then remove the beans by lifting the edges of the paper. Continue cooking for  about 15 minutes so that the dough dries out. Cool on a wire rack
5. While the crust cools, clean the strawberries by removing the green leaves and washing them quickly under cold water. Pat dry with paper towels and cut them in halves or into slices of about 2-3 mm (⅛ in). Transfer the crust onto a serving plate, fill it with custard and decorate with strawberries
6. For the gelatin, place 230 ml (about 1 cup) water in a sauce pan, add the filtered lemon juice,  the gelatin powder and sugar. Mix together all the ingredients with a whisk, bring to  boil and cook for 2 minutes. Allow the gelatin to cool, stirring a few times for about 2 minutes, then pour it over the entire cake
7. Put the strawberry tart to cool in the refrigerator for at least an hour.

Note: Traditionally the pasta frolla crust is quite hard.  I prefer a tender, fluffy crust.  My recipe calls for starch,  baking powder (a leavening agent) and creaming the butter; all contribute to the dough’s lighter texture. -Paola

Focaccia Dolce con Crema di Cioccolato (Sweet Focaccia Filled with Chocolate Cream)

23 Apr

Sweet focaccia : a childhood memory! Something that my mom used to prepare for me as an afternoon snack after school, something da leccarsi le dita (literally to lick your fingers, to make your mouth water)! It is popular in some Northern regions, made simply like a regular focaccia (see post http://passionandcooking.com/2013/01/29/focaccia/ ) but with sugar in the dough and sprinkled with sugar, raisins, honey or almonds.  It is even tastier if you fill it with chocolate cream, a rich and creamy spread made mainly of dark chocolate and roasted Piedmont hazelnuts. Piedmont is very famous for its hazelnuts that are used in many chocolate confections, including spreadable creams, the ultimate chocolate ecstasy. The chocolate spread is something favored by kids but it also ranks high amongst adults as comfort food. It is delicious on toasts, crackers and bananas. Have you ever tried an Italian-American banana sandwich? Take two slices of banana and top one with chocolate cream and the other with peanut butter; put them together and pop the whole thing into your mouth. It’s something to die for!!!!

FOCACCIA DOLCE CON CREMA DI CIOCCOLATO (SWEET FOCACCIA FILLED WITH CHOCOLATE CREAM)
Preparation time: 2 ½ hours           Baking time: 15-20 minutes     Servings: 6-8

Focaccia con Nutella Fetta

INGREDIENTS
Basic recipe
500 g (3 cups) high-gluten flour (Manitoba)
250 ml water (1 cup + 5 tablespoons) + 100 ml (7 tablespoons) skimmed milk at 45°C, 110 °F
130 ml (9 tablespoons) olive oil (Extra Virgin)
5 g (1 teaspoon) salt
80 g (6 tablespoons) sugar
1 package (7 g ;1 heaping teaspoon) dried yeast or 1 cube (25 g; about 1 ounce) fresh yeast
Granulated sugar

Filling
Chocolate cream

DIRECTIONS
1. In a small pitcher mix water and milk. Stir in salt until dissolved, then add 40 ml (3 tablespoons) olive oil.  Mix well, then dissolve sugar in it.  Sugar is the so called “nourishment” for yeast 
2. Pour the liquid in a large glass bowl and combine with half of the flour.  Stir well until you have a smooth batter
3. Add yeast to the batter, stirring well.  Remember never add yeast directly to salt, because it  prevents the yeast from rising
4. Add the remaining flour to the batter.  Mix well until you have a smooth and even dough, but still a little bit sticky
5. Remove the dough from the bowl and turn it out onto a lightly floured surface; knead briefly for about 1-2 minutesDo not add too much flour otherwise the dough will get tough
6. Lightly oil (with about 3 tablespoons) a 25×35 cm (10×14 in.) baking sheet; place the dough in center of the pan and cover with a cotton towel.  Let rise in a warm, draft-free place (about 30°C, 86°F) for about 60-90 minutes until doubled in size
7. Preheat oven to 220 °C (425°F)
8. Pat the dough into the baking sheet, filling it completely.  Brush the dough with oil.  Let it rise for about 30 minutes at 30°C until increases its volume
9. Press some deep holes into the dough with your finger tips, covering the entire surface
10. Drizzle with about 3 tablespoons oil olive (cover all areas of the dough) and wet the top with some water, using a spray-bottle, to keep focaccia soft.  Sprinkle with some granulated sugar (2-3 tablespoons)
11. Bake for 15-20 minutes until golden
12. Remove from oven and cool on a grid. When it is cool fill it with the chocolate spread. I would recommend to fill only the piece you are going to eat. It is especially tasty if you eat it warm.

Note: The type of water is very important; the pH should be around 6.  I usually use bottled drinking water to avoid having too much chlorine in the dough. The rising temperature is critical too, therefore place the dough in a warm draft-free place and do not open the oven during baking.  Another important piece of information is to never mix salt and yeast directly, because salt inhibits the action of the yeast.  Focaccia can keep for about two days wrapped in plastic wrap without filling, but I suggest eating it fresh, just out of the oven, to fully enjoy its fragrance.  -Paola

Colomba con Crema al Limoncello (Easter Cake with Limoncello Cream)

28 Mar

If you have ever celebrated Easter in Italy, you may have tasted our Colomba di Pasqua (Easter Dove). This is an Italian dessert only available at Easter, something in between a cake and a sweet bread loaf. The particularity of this cake is that it is shaped like a dove, the symbol of peace and rebirth. In the Catholic tradition it also symbolizes the Holy Spirit. The cake is very soft and the ingredients are simple, flour, eggs, natural yeast, butter, sugar and candied orange. The dough is shaped into a dove, glazed with a shiny coat of sugar syrup, coarse sugar and sprinkled with almonds before baking. This is the traditional recipe, but nowadays many variations are available, such as glazed with chocolate or filled with creams, and without candied fruit. Colomba traces its origins to the middle of the sixth century. According to a legend, King Alboin conquered Pavia the day before Easter, and a dove-shaped cake was offered to him as a sign of peace. A more realistic story, though, is that at the beginning of the twentieth century the Milanese company Motta started producing an Easter version of Panettone (Christmas cake). You can enjoy it with sparkling sweet wine such as Moscato d’Asti or sweet Passito wine from Sicily. Just like Panettone, it can be served plain or with mascarpone cheese cream flavored with different fruity liqueurs. One of my favorites to use is Limoncello, a delicious after dinner digestivo, frequently served in Italy and Italian restaurants, you might have tasted this delicious liqueur (served chilled) made from Sorrento lemon zest. This liqueur has a very fresh lemon citrus flavor that blends extremely well with the creamy taste of mascarpone and the sweetness of Colomba. Enjoy it and Happy Easter!  Buona Pasqua!

COLOMBA CON CREMA AL LIMONCELLO (EASTER CAKE WITH LIMONCELLO CREAM)
Preparation time: 10 minutes

Colomba smallINGREDIENTS
Mascarpone cheese cream
250 g (9 oz) fresh mascarpone cheese at room temperature
3 tablespoons powdered sugar
110 ml (1/2 cup) heavy cream
6-7 tablespoons Limoncello

DIRECTIONS
1. In a small bowl mix the cream and Limoncello
2. Place the mascarpone and sugar in a medium mixing bowl. Use electric mixer to whisk for 1 minute or until sugar dissolves. Then add the cream-liqueur mix. You can serve the mascarpone either on top of the Colomba slice or aside.

Note: Colomba is a simple cake but the preparation is laborious because the raising time occurs in different stages and the temperature of the room is critical. There are so many good brands available on the market, and many pastry shops produce their own Colomba Artigianale or Artisan Colomba. -Paola

Torta al Cioccolato e Barolo Chinato (Barolo Chinato Chocolate Cake)

10 Feb

This delicious dark chocolate cake flavored with Barolo Chinato and served with whipped cream and raspberries is a truly romantic treat for an amorous occasion such as Valentine’s Day.  Chocolate, the so called natural “love drug” and one of the top ten aphrodisiac foods, is definitely an excellent choice when celebrating this holiday.  The feeling eating chocolate produces is the same you feel as when falling in love so … let’s eat more chocolate!!!  In fact, several compounds present in chocolate have been linked to one’s mood and pleasure, such as phenyl-ethylamine which has amphetamine-like stimulating properties and tryptophan, related to serotonin, a substance associated with ecstasy and happiness.  In addition to its “love effects”, dark chocolate – rich in antioxidants – provides other beneficial properties such as reducing your levels of free radicals, which are responsible for cellular damage, aging and cancer.  This delicious food is obtained from the tropical tree Theobroma Cacao, which has been cultivated in central and south America for at least three millennia.  The Aztecs thought it gave strength and power to their warriors. In the past chocolate has been considered more medicinal, rather than the delicious treat it is today.  In this recipe, the chocolate’s aroma blends well with the distinct flavor of Barolo Chinato, a Barolo wine flavored with a variety of herbs and spices, including quinine bark (china in Italian, pronounced KEY-na), and sweetened with a touch of sugar.  As a dessert wine Barolo Chinato is a perfect match for rich sweets, especially those with chocolate like this superb cake.  So when making the cake, save a glass (better yet, save 2!) to enjoy with your cake.  And now, food meets art!  Chocolate is not only a delicious treat; some artists use it as an expressive material in their work.  If you like video performances please take a look at my dear friend and great artist, Ciriaca Erre’s video “Can I have another question?” A passionate and emotional modern Medea.  Enjoy it!!! http://www.youtube.com/watch?v=ORCWRiQ7_tM&feature=player_embedded  
www.ciriacaerre.com

TORTA AL CIOCCOLATO E BAROLO CHINATO (BAROLO CHINATO CHOCOLATE CAKE)
Preparation time: 1 ½ hours                              Baking time: 45-50 minutes

Torta al cioccolato fetta small

INGREDIENTS
250 g (1 cup +2 tablespoons) unsalted butter, at room temperature
260 g (1 ¼ cups) granulated sugar
30 g (8 tablespoons) cocoa powder
250 g (1 ½ cups) flour, type 00
15 g (1 tablespoon) baking powder
½ teaspoon salt
4 large eggs separated
150 g (5 ounces) dark chocolate (70%)
240 ml (1 cup) Barolo Chinato
250 g (2 cups) raspberries
250 ml (1 cup) heavy cream
2 tablespoons powdered sugar

DIRECTIONS
Preheat oven to 165°C (325°F)
1. Sift flour, baking powder and salt together in a bowl.  Set aside
2. In a large bowl cream the butter with sugar and cocoa using an electric mixer.  Beat in egg yolks one at the time
3. In a double boiler, heat wine slowly and melt chocolate.  Cool for about 5 minutes.
4. Add the wine-chocolate mixture to the butter and mix well with a spoon
5. Gradually stir in the dry ingredients until you have a smooth batter
6. In a medium bowl, using clean beaters, beat egg whites until firm and glossy
7. Gently fold whites into the batter using a spatula until there are no more white streaks
8.Grease and flour a 24 cm (10 in) spring-form pan
9. Pour in the batter and bake for about 45-50 minutes until a tooth pick inserted in the center comes out clean
10. Cool for 10 minutes on a wire rack.  Remove from the pan and cool completely on a wire rack
11. Wash raspberries under running water.  Gently dry them with paper towels.  Set aside
12. In a medium bowl combine cream and powdered sugar, and beat with an electric mixer until soft peaks form.  Decorate the cake with whipped cream and raspberries.

Note: You can substitute Barolo Chinato with another sweet or fortified red wine such as Marsala, Port or Sherry.  -Paola


Chiacchiere (Sweet Carnival Fritters)

3 Feb

Carnevale, Carnival or Mardi Gras (Fat Tuesday), is a huge Catholic festival celebrated forty days before Easter, before Ash Wednesday, with masquerade balls, parades and public street parties.  Masks, or maschere, are one of the most important parts of Carnival, and cities all over Italy celebrate this festival in one way or another, although Venice is certainly the most well-known Italian city for its traditional Carnival masks and parties.  The streets are full of people dressed in costumes, and all over town artists and singers entertain with performances and songs.  It is a unique adventure worthy of the experience!  This festive event is also celebrated by eating special treats prepared only during this season.  Chiacchiere (literally “chit-chat” or “small talk”, pronounced key-AH-ker-ay) are crispy fritters made with flour, sugar, butter, eggs and liquor, although this last ingredient may be eliminated during Lent.  Chiacchiere are known by different names depending on the region from which they originate.  For example chiacchiere and lattughe (because they recall the appearance of lettuce leaves) are found in Lombardy, cenci (meaning rags) and donzelle in Tuscany, frappe in Emilia Romagna and bugie (meaning “lies”) in Piedmont.  Whatever you call them, they are delicious, delicate pastries that both adults and kids love.  I remember making this special snack with my grandmother; this was part of our annual carnival celebration.  We had a lot of fun making them, and I delighted in eating them – it is still a very memorable occasion.  I now make chiacchiere each Carnival season with my kids too, part of our family cooking tradition!!  Chiacchiere trace their origins from ancient Roman times when they were called frictilia, tasty sweet dough fried in lard, the most common frying fat available at the time.

CHIACCHIERE (SWEET CARNIVAL FRITTERS)
Preparation time: 1 ½ hours                                      Servings: 6-8

Chiacchere sigla 4 small

INGREDIENTS
500 g (3 cups) flour 00
70 g (1/3 cup) granulated sugar
7 g (1 heaping teaspoon) baking powder
1 pinch salt
60 g (4 tablespoons) unsalted butter, room temperature and diced
3 large eggs + 1 egg yolk
½ teaspoon vanilla extract
30 ml (2 tablespoons) dry Marsala (grappa, brandy)
Oil for deep frying
Powdered sugar

DIRECTIONS
1. In a large bowl sift together the dry ingredients (flour, sugar, baking powder and salt)
2. Add the butter and mix with a pastry cutter.  In a small bowl beat the eggs, then add the eggs, vanilla extract and Marsala to the dry ingredients, mixing well.  Blend the dough well with floured hands until it is smooth and elastic
3. Remove the dough from the bowl and knead it for about 10 minutes on a floured surface.  Wrap the dough in plastic wrap and let it rest for at least 30 minutes in a cool place
4. Divide the dough in four equal parts and roll out one part at the time (keeping the rest in the plastic wrap until ready to work).  Rolling out chiacchiere is just like rolling out pasta dough.

ROLLING OUT BY HAND.  To roll out your dough you need a wooden pin – mattarello – (about 80 cm long and 4 cm diameter, 37 x 2 in).  Dust each piece lightly with flour and roll out to the desired thickness, about 2 mm.  Cut the dough into rectangular strips using a table knife or a serrated pastry wheel (10 x 5 cm; 4 x 2 in) and let them rest for about 5 minutes on a cotton dish towel.  Make two parallel cuts down in the middle of each strip about 5 cm (2 in) long, taking care to leave the ends of the strips intact.

ROLLING OUT BY MACHINE.  A hand-cranked pasta machine is the best to use.  Kids especially love this part, so I usually have some help!  Start out using the widest setting.  Run the dough through for about 5-6 times until the dough is smooth.  If the sheet tears dust it with flour.  Continue to run each sheet through the machine, reducing the thickness a notch at a time, until you reach the desired thickness. I use setting number 5.  The dough should be very smooth.  Once you reach the desired thickness, follow the same procedure as above for cutting the dough.

5. In a heavy skillet gradually heat some frying fat to the required temperature of about 180°C (350 °F).  If you do not have a thermometer use this easy test.  Drop in one cube of bread (about 2.5 cm, 1 in).  If the cube browns after 60 seconds, the fat will be ready for frying.  Fry the strips for about one minute until golden on both sides, turning them once
6. Remove them from the skillet and let rest on a grid covered with paper towels to absorb the excess oil
7.Sprinkle liberally with powdered sugar when they are cool. 

Note: Deep frying is a dry heat cooking method.  Choose your cooking fat carefully.  Fats with high “smoke points” are the best.  Peanut oil, safflower oil, sunflower oil and canola oil are good choice.  Lard is very good frying fat too, because it withstands very high temperatures.  It was commonly used in the past in many cuisines, but it is used less now because it has a strong, distinct taste that can cover the food’s flavor.  -Paola