Archive | October, 2013

Pane Toscano (Tuscan Bread)

27 Oct Pane Toscano

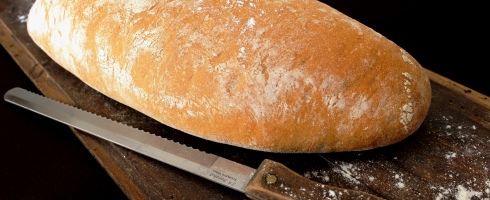
“L’uomo non vive di solo pane / Man does not live by bread alone” … but this certainly doesn’t seem to apply in Tuscany. For centuries Tuscan bread has been a staple for the poor. The Tuscan bread recipe is salt-free, therefore called in Italian “pane sciapo”. In fact, its taste goes well with traditional Tuscan cuisine rich in salt and abundant flavors. It has a crispy reddish crust, while the interior is soft, but not spongy . It is a perfect base for delicious appetizers or “stuzzichini”. It can be served with tasty cured meat products, “affettato”,  such as Tuscan Prosciutto Crudo, salami (fennel-flavored finocchiona) or Tuscan pecorino cheese, and it is one of the most appetizing ways to start a meal. It can also accompany savory soups such as “ribollita” and “pappa al pomodoro”.  It can also be used for the typical “panzanella”, a bread and tomato salad. Moreover it is very palatable in the form of crouton slices, thin pieces of grilled or fried bread. The croutons are very good with chicken liver pate’, olive paste, or as the base of the famous “bruschetta” with olive oil, garlic, tomatoes and fresh basil. The lack of salt has historical roots: around the twelfth century, because of the struggle between the cities of Pisa and Florence, the maritime republic stopped the salt trade to the countryside, and because of this the farmers had to prepare their bread without salt. Today, this tradition is generally maintained, although nowadays in some areas of Tuscany bread is lightly salted. You can add a small amount of salt (about 5 g (1 tsp) for 500 g of flour, 3 cups), according to your taste and to match the food you are eating.

TUSCAN BREAD
Preparation time: 3 hours  Cooking time: 35-40 minutes  Servings: 8

IMG_1904

INGREDIENTS
500 g (3 cups) gluten-rich flour (Manitoba)
260 ml (1 cup + 2 tablespoons) water at 45 °C -110 °F
5 g (1 tsp) sugar
1 package (7 g, 1 heaping teaspoon) dried yeast or 1 cube (25 g, about 1 ounce) fresh yeast
2 tablespoons olive oil (Extra Virgin)

DIRECTIONS
1. In a small glass or bowl, dissolve in about 100 ml of the warm water, sugar and yeast. Sugar is the so-called ” food” for the yeast
2. In another bowl, mix the remaining water well with the oil
3. Pour the liquid containing sugar and yeast into a large glass bowl. Add half of the flour and mix well until smooth
4 . Continue adding the remaining flour and the water with olive oil until a smooth ball can be formed
5. Remove the dough from the bowl and knead on a lightly floured surface, by hand for about 10 minutes. Do not add too much flour otherwise the dough will become tough
6. Put the dough in a glass bowl and let rise for about 20 min. Cover with a cotton towel. Let rise in a warm draft-free place at a temperature of approximately 30°C or 85°F.
7. After this time, knead the dough on a floured work surface about a dozen times.
8. Form a strand without handling it too much, cover with a sprinkling of flour , place on a baking sheet previously covered with greaseproof baking paper . Let rise for about 2 hours covered with a cotton towel.  Remember that the dough should rise in a warm room.
9. Preheat oven to 180 °C.
10. Bake for 35-40 minutes until golden brown.
11. Remove from oven and let cool on a rack.  – Paola

Pasta con Zucca e Amaretti (Pasta with Pumpkin and Amaretti)

19 Oct

It is pumpkin season! Pumpkin is an autumn vegetable, very tasty and suitable for the preparation of a variety of recipes This recipe for pasta with pumpkin and amaretti cookies is a perfect, colorful dish on a cold and gray day. Amaretti refer to the almond flavored macaroons, crispy and crunchy, which are traditionally from Saronno, a small city in Lombardy between Como and Milan. The taste of the pasta blends well with the sweetness of pumpkin, the addition of sage gives a fragrant aroma . The flavor is unique and special; it definitely satisfies the taste of those people who love combining sweet and savory foods. I love this recipe because it reminds me so much of my childhood. In fact, this recipe is part of my family’s culinary tradition and goes back to my great-grandmother. Actually, I’ve never eaten it in any restaurant nor have I even seen it on the menu, so this is a true this is an exclusive for my readers. The pumpkin that I use is the “zucca mantovana” (Cucurbita maxima, Kabocha). It takes its name from Mantua (Mantova), a city in Lombardy where it grows in abundance because the soil is particularly suited to this vegetable. Its pulp is tender and very sweet, with its flavor somewhere between sweet potato and chestnut, with an almost nutty taste.

PASTA CON ZUCCA E AMARETTI (PASTA WITH PUMPKIN AND AMARETTI COOKIES)
Preparation time: 30 min.        Cooking time: 20 min.            Servings: 4

Pasta con Zucca e Amaretti

INGREDIENTS
1350 g (3 lbs) fresh pumpkin (about 260 g, or 2 cups, mashed)
340 g (12 0z) penne
18 finely crushed amaretti
100 g (7 tablespoons) butter
4-5 sage leaves
1 pinch nutmeg
1 pinch of cinnamon
Salt and freshly ground pepper
Grated Parmesan cheese

DIRECTIONS
1. Cut pumpkin into 4 pieces, remove seeds and strings. Wash in water. Bake pumpkin at 200 °C -400 °F (see pumpkin risotto‎‎) or steam. While it is still warm, remove the skin and mash into puree
2. Bring approx. 3 liters of salted water to a boil, cook pasta for about 10-11 minutes until al dente (read the cooking time on the package)
3. While pasta is cooking, melt half the butter in a saucepan, add pumpkin and 16 crushed amaretti, nutmeg and cinnamon. Season with salt. Add a few tablespoons of the cooking water to make the pumpkin puree creamier
4. Melt the remaining butter in a pan with the sage to flavor the butter. If you prefer you can remove the sage, however I leave it because I really like its intense flavor
5. Drain and transfer the pasta to the pan, stir gently and add the sage-flavored butter. Transfer onto a serving plate and garnish with crumbs from 2-3 crushed amaretti, Parmesan cheese and pepper to taste.

Note: You can use any type of short pasta such as macaroni , mezze penne , garganelli, tortiglioni and so on. You can substitute “zucca mantovana” with butternut squash (Cucurbita moschata).  – Paola Lovisetti Scamihorn

Cotoletta alla Milanese (Milanese Cutlet)

13 Oct

Cutlet is one of most typical dishes from Milan, sharing the stage with Milanese risotto and “panettone”. It is a veal cutlet, coated with egg, covered with bread crumbs and then fried in butter with sage. The sage gives a special aroma to the meat, a real delight! There are two variations of cutlet: one thicker, the meat is more tender and a thinner one, in which the crunchy breading is more prominent. The latter version is sometimes called elephant ear, because of its shape. It should not be mistaken for Weiner Schnitzel from Vienna. The Milanese cutlet includes the bone, whereas Viennese does not. In addition, the Milanese is dredged only in bread crumbs, instead the Viennese both in flour and bread crumbs and then fried in lard. As you will often find in these cases, there is a debate about where this dish comes from. So far there is no definitive answer, but being Italian, I should say that it is Italian … and we are proud of it! It can be served as a main dish served with potatoes or a salad. It is something that I often prepare for a family dinner. My kids love it, especially when I serve it with homemade potato croquettes.

COTOLETTA ALLA MILANESE (MILANESE CUTLET)
Preparation time: 15 minutes                            Servings: 4

Cotoletta alla Mil

INGREDIENTS
4 veal cutlets (about 600 g, 1 ½ pounds)
2 eggs
1 teaspoon salt
400 g (about 2 cups) bread crumbs
70 g (5 tablespoons) butter
2 sage leaves

DIRECTIONS
1. Lightly beat the eggs with salt in a deep dish
2. Spread out the bread crumbs on a plate
3. Dip each cutlet first in the egg and then cover with bread crumbs, making sure that both sides are well coated
4. In a large frying pan over medium heat, melt the butter, add sage and then cutlets without crowding. Cook, turning only once, for about 6-8 minutes on each side, until golden brown and crispy. Transfer to a serving plate and serve with a wedge of lemon. The lemon juice add a special zest to the fried meat. -Paola
Paola

Crocchette di Patate (Potato Croquette)

6 Oct

Potato croquette is a small breaded, fried potato roll, usually shaped into a cylinder. It is an Italian classic that can be served either as a tasty appetizer or a fancy side dish. A plate of croquettes becomes something a bit more special when stuffed with cheese or ham, and it can even be served as a main course, delighting both kids and adults. My kids love when I prepare them, they disappear in a blink of an eye!  The term croquette originates from the French croquer “to crunch”.  Croquettes are easy and quick to prepare, but in spite of this the result is spectacular. The use of simple ingredients, such as mashed potatoes, eggs, Parmesan cheese and spices, provide a soft texture and a delicate and appetizing taste. Of course, frying adds an extra mouth-watering flavor.

CROCCHETTE DI PATATE (POTATO CHROQUETTE)
Preparation time: 40 minutes                            Servings: 8 Crocchette di patate

INGREDIENTS
800 g (28 oz) potatoes
100 g (1 cup) grated Parmesan cheese
1 egg yolk
Grated nutmeg, a pinch
Salt and freshly ground pepper, to taste
2 eggs
Breadcrumbs
Oil from frying

DIRECTIONS 
1. Cook the potatoes until just tender either by boiling or baking.  The potato flesh for croquette should be dry, therefore it is better to boil the potato in the skin to prevent water absorption.  Drain well and set aside until just cool enough to remove the skin.  The potatoes should be warm
2. Put the warm potatoes through a potato ricer (never a mixer) into a bowl, season to taste with salt, nutmeg and pepper. Add the egg and Parmesan, mix just enough until the dough is formed
3. Take an abundant tablespoon of dough and make a cylindrical shape. In a bowl beat the eggs, one at a time pass each croquette in the egg then in breadcrumbs . Continue until all the dough is finished
4 . In a frying pan (better in a deep fryer ) heat plenty of peanut oil to 180° C (350° F) . If you do not have a cooking thermometer to check the temperature, you can test with a small piece of bread . If after 60 seconds is colored, the oil temperature is perfect. Put 3-4 croquettes at a time into the pan, in this way you prevent to lower the temperature of the oil 5 . When they are evenly gold, remove with a slotted spoon and place on a plate covered with paper towels. Serve hot.

Note: The type of potatoes is crucial (I strongly recommend to use patate farinose, rich in starch) as well as the potato ricer. – Paola