Archive | Bread and Focaccia RSS feed for this section

Focaccia di Recco

23 Mar

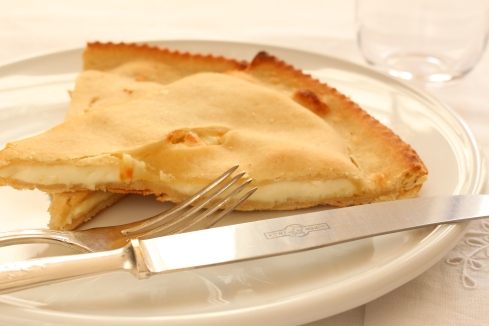
Focaccia di Recco is a delicious snack that can be enjoyed any time during the day. When we think about focaccia, we usually think about bread dough with yeast; instead the peculiarity of the focaccia di Recco is the lack of yeast! For this reason it is also good for people who are intolerant to this ingredient.

It takes its name from the town of Recco in the Ligurian Riviera di Levante. The dough is very simple, made ​with flour, extra virgin olive oil, salt and water. The filling is stracchino or crescenza, a soft cow’s-milk cheese with a mild and delicate flavor. The name stracchino comes from the Italian word “stracca” meaning tired. This refers to the fact that the milk from the tired cows coming down in autumn from the alpine pastures, is richer in fat and it has a characteristic taste. The delicious combination of this dough and stracchino makes this preparation unique, a special treat for both adults and children. My kids love it for a quick lunch after school or for an afternoon snack. You can also serve it as a tasty appetizer with a glass of prosecco.

The history of focaccia di Recco is ancient and dates back to the third crusade. It was an affordable food when only simple ingredients were available. At the end of the 1800s it was added to the menu of the various local trattorie (rustic restaurant) as a special dish for the Day of the the Dead, celebrated on November 1st. Today it is enjoyed all year round and not just in Liguria!

FOCACCIA DI RECCO
Preparation time: 150 min . Cooking time : 10 min. Servings : 6 people

Focaccia di Recco

INGREDIENTS
320 g (2 cups) Mannitoba flour
200 ml (1 scarse cup) water, room temperature
8 g (1 heapping teaspoon) salt
45 ml (3 tablespoons) olive oil (Extra virgin)
500 g (19 oz) stracchino or crescenza cheese

DIRECTIONS
1. In a medium bowl combine water and oil, then dissolve salt
2. Place the flour in a large bowl, add the liquid. Start mixing with a fork incorporating the flour little by little, then mix with a wooden spoon until you obtain a smooth dough. Transfer to a floured work surface and knead (about 10 min.) with your hands until the mixture is uniform and elastic. Wrap in plastic paper and let it rest for about two hours at room temperature
3. Divide the dough into two equal parts and roll out with a rolling pin on a floured work surface trying to keep it as round as possible and pretty thin, about 1.5 cm. Now the hard part comes: you’ll have to pull the dough with your hands (floured) until it is almost transparent. It is important not to have holes in the dough, otherwise the cheese will come out when it bakes
4. Preheat oven to 230 °C (450 °F)
5. Grease a round baking pan (30 cm, 12 inch diameter) with olive oil and place a sheet of dough on it, cover with the cheese cut into pieces (not too small). Cover with the other sheet, sealing the edges well with your hands and pinching the surface 5 or 6 times. Brush the top with olive oil
6. Bake for 10-15 minutes until the surface is golden Serve hot. If there is any left which you can it heat it again in a hot oven for a few minutes. Paola

Gnocchi di Pane Raffermo (Stale Bread Dumplings)

12 Mar

This is a quick and easy recipe for gnocchi made with stale bread!

These bread dumplings, also called Zanzarelli, are an ancient food. They began to appear in the Renaissance banquets in Lombardy as a delicacy and were prepared with bread crumbs, milk and chopped almonds. The recipe that I am proposing belongs to my family’s culinary traditions. I remember that I prepared these delicious dumplings with my grandmother at least once a week, especially on Friday (the gnocchi day). This dish is very tasty and can satisfy the palates of lovers of sweet-savory combinations and spicy food. The recipe includes stale bread, raisins, cinnamon, nutmeg and grated Parmesan cheese. Once boiled, the dumplings are served with melted butter flavored with sage. The sage’s aroma gives a fragrant and delicate taste to this recipe. You can enjoy it as a first course or as main dish. These are an excellent alternative to the traditional potato dumplings (see post gnocchi di patate) and can also be an appetizing vegetarian dish containing, however, eggs.

GNOCCHI DI PANE (STALE BREAD DUMPLINGS)
Preparation time: 20 min. Cooking time: 1-2 min. Servings: 4

Gnocchi-di-pane

INGREDIENTS
180 g (6.5 oz) stale bread
150 g (5 oz) raisins
140 g (5 oz) grated Parmesan cheese
160 grams (1 cup) all-purpose flour
2 eggs
1 teaspoon cinnamon
Pinch nutmeg
Salt
Milk

Dressing
60 grams (2 oz) unsalted butter, melted
3 sage leaves

 DIRECTIONS
1. In a large bowl soak the bread with milk. Let stand for about 15 min. until the bread is completely softened
2. Meanwhile in a small bowl, soak the raisins in lukewarm water for 5 minutes
3. Squeeze the bread with your hands to completely eliminate milk. In a large bowl combine bread, Parmesan, cinnamon, nutmeg, salt, strained raisins, egg and flour. Mix with a wooden spoon until dough is smooth. The amount of flour should be adjusted after cooking a couple of dumplings as a test (See next point)
4. In a pot, bring plenty salted water to a boil. Drop in a small ball of dough (teaspoon-sized). Before cooking the entire amount of dough, I suggest you do a test with a couple of dumplings to see if the dough is set. The right dumpling should be firm but not hard and does not break into pieces in the water. If it breaks , you should add 1-2 tablespoons of flour and repeat the test.
5. Remove the dumplings with a slotted spoon as soon as it floats, about 1-2 min.
6. In a separate sauce pan melt the butter with sage, to give the flavor. Arrange gnocchi on a serving plate and toss with the flavored butter and grated Parmesan cheese.- Paola

Pane Toscano (Tuscan Bread)

27 Oct Pane Toscano

“L’uomo non vive di solo pane / Man does not live by bread alone” … but this certainly doesn’t seem to apply in Tuscany. For centuries Tuscan bread has been a staple for the poor. The Tuscan bread recipe is salt-free, therefore called in Italian “pane sciapo”. In fact, its taste goes well with traditional Tuscan cuisine rich in salt and abundant flavors. It has a crispy reddish crust, while the interior is soft, but not spongy . It is a perfect base for delicious appetizers or “stuzzichini”. It can be served with tasty cured meat products, “affettato”,  such as Tuscan Prosciutto Crudo, salami (fennel-flavored finocchiona) or Tuscan pecorino cheese, and it is one of the most appetizing ways to start a meal. It can also accompany savory soups such as “ribollita” and “pappa al pomodoro”.  It can also be used for the typical “panzanella”, a bread and tomato salad. Moreover it is very palatable in the form of crouton slices, thin pieces of grilled or fried bread. The croutons are very good with chicken liver pate’, olive paste, or as the base of the famous “bruschetta” with olive oil, garlic, tomatoes and fresh basil. The lack of salt has historical roots: around the twelfth century, because of the struggle between the cities of Pisa and Florence, the maritime republic stopped the salt trade to the countryside, and because of this the farmers had to prepare their bread without salt. Today, this tradition is generally maintained, although nowadays in some areas of Tuscany bread is lightly salted. You can add a small amount of salt (about 5 g (1 tsp) for 500 g of flour, 3 cups), according to your taste and to match the food you are eating.

TUSCAN BREAD
Preparation time: 3 hours  Cooking time: 35-40 minutes  Servings: 8

IMG_1904

INGREDIENTS
500 g (3 cups) gluten-rich flour (Manitoba)
260 ml (1 cup + 2 tablespoons) water at 45 °C -110 °F
5 g (1 tsp) sugar
1 package (7 g, 1 heaping teaspoon) dried yeast or 1 cube (25 g, about 1 ounce) fresh yeast
2 tablespoons olive oil (Extra Virgin)

DIRECTIONS
1. In a small glass or bowl, dissolve in about 100 ml of the warm water, sugar and yeast. Sugar is the so-called ” food” for the yeast
2. In another bowl, mix the remaining water well with the oil
3. Pour the liquid containing sugar and yeast into a large glass bowl. Add half of the flour and mix well until smooth
4 . Continue adding the remaining flour and the water with olive oil until a smooth ball can be formed
5. Remove the dough from the bowl and knead on a lightly floured surface, by hand for about 10 minutes. Do not add too much flour otherwise the dough will become tough
6. Put the dough in a glass bowl and let rise for about 20 min. Cover with a cotton towel. Let rise in a warm draft-free place at a temperature of approximately 30°C or 85°F.
7. After this time, knead the dough on a floured work surface about a dozen times.
8. Form a strand without handling it too much, cover with a sprinkling of flour , place on a baking sheet previously covered with greaseproof baking paper . Let rise for about 2 hours covered with a cotton towel.  Remember that the dough should rise in a warm room.
9. Preheat oven to 180 °C.
10. Bake for 35-40 minutes until golden brown.
11. Remove from oven and let cool on a rack.  – Paola

Piadina Romagnola

29 Aug

Piadina (in English “flatbread”), is one of the most popular dishes of the Emilia Romagna region, and it is certainly appreciated all over the country. It looks like a pastry disk, made of flour, lard, salt and water, and it is traditionally cooked either on a terracotta dish or metal griddle over hot coals. Piadina has an ancient history dating back to the Etruscans, who prepared a batter of cereals similar to piadina. For many years, this flatbread was considered a peasants’ meal because the ingredients are simple and easy to find. The traditional piadina is filled with Parma ham (prosciutto crudo), squacquerone or crescenza, fresh and tasty cheeses, quite soft and mild tasting, and of course with arugula (rocket) which gives the sandwich a zesty taste to munch on! It is also delicious when it is spread only with cheese and arugula, and a perfect foil for cold cuts or grilled sausages too; actually the choice is unlimited. It is up to you to decide how you prefer to enjoy it. It is an ideal dish for lunch, for a quick snack during the day. It can also be consumed as a substitute for bread to accompany various dishes. It is an excellent cookout bread. The homemade piadina, of course, has a distinctive flavor and aroma, but nowadays it is very common to consume pre-cooked piadina which is then heated on a griddle and then filled at the moment.

PIADINA ROMAGNOLA
Preparation time: 40 minutes          Cooking time: 5-6 minutes          Servings: 4

Piadina Ripiena

INGREDIENTS
500 g (3 cups) all-purpose flour
65 g (2,5 oz) soft lard
2 g (½) baking soda
6 g salt
200 ml (¾ cup) lukewarm water
200 g (7 oz) Prosciutto crudo
100 g (3.5 oz) squacquerone or crescenza cheese
Arugula

DIRECTIONS
1. Mix flour and baking soda in a bowl. Dissolve salt in the water
2. Make a volcano with the flour on the work surface, making sure to form a “crater” big enough for holding the lard. Mix well by slowly adding lard and water. Knead to a smooth and homogeneous dough
3. Cover with a cotton cloth and let rest for about 30 minutes at room temperature
4. Divide the dough into 4 balls of equal size. To roll out the dough flatbread you need a wooden rolling pin – about 80 cm (32 inch) long and 4 cm (1 ½ inch)in diameter. Sprinkle with flour and roll out the dough to a thickness of about 5 mm (⅛ inch) and make 4 discs of 23-25 cm (10 inch) in diameter. To obtain smooth edges use a wheel cutter with a smooth blade following the contour of a circular plate
5. Heat a non-stick skillet over medium-high heat, wait until it is hot and place a disc of dough on the pan. Punch with a fork and cook for about 2-3 minutes on each side. It may puff up. If it does gently press the bubbles with a spatula
6. Spread with a thin layer of cheese, cover with a few slices of ham and garnish with arugula
7. Fold in half and serve warm.

Note: You can substitute lard with olive oil – about 110 ml (½ cup). The result will be a lighter piadina. You can also substitute water with milk; I personally prefer the taste of water. It is also possible to freeze piadina. Wait until it is completely cool, wrap in plastic wrap and freeze.  Remove from the freezer, thaw and heat on a non-stick skillet.   -Paola


Frese al Pomodoro (Frese with Tomato)

26 Jun

This is a simple recipe for an appetizing summer snack.  Frese are an excellent alternative to bread for appetizers, quick to prepare and definitely delicious to taste.  They are called frese in Calabria, frise or friselle in Puglia and freselle in Naples; it does not matter what you want to call them, they are wonderful!!  Frese, a type of twice-baked bread, are made with durum wheat. The ring shaped dough is baked until almost done, then cut in half and toasted in the oven again until it is as hard as a rock. This type of bread is an ancient recipe from the traditional peasant cuisine of southern Italy.  In the past frese were commonly used in place of bread; in fact, because they are dried they keep longer. To enjoy frese you should first wet them with water or tomato juice. The amount of water and the soaking time are personal: obviously more for a soft texture and less for a crunchier snack. You can serve them with fresh tomato, oregano, salt and olive oil. They are also very tasty with garlic and other ingredients for topping such as red pepper, black olives, tuna or anchovies. Be creative and use your favorite Mediterranean topping!

FRESE AL POMODORO (FRESE WITH TOMATO)
Preparation time: 30 minutes       Servings: 4

Fresa con pomodoro

INGREDIENTS
4 frese
4 large tomatoes
2 garlic cloves
2 tablespoons olive oil (Extra Virgin)
oregano
Salt

DIRECTIONS
1. Peel the tomatoes after blanching in boiling water for approximately 1 minute. This procedure allows  to remove the skin more easily. Cube the tomatoes, season with salt and let stand for about 10-15 minutes
2. Rub frese with garlic
3. Wet frese with plenty of tomato juice and let rest for about 15 minutes
4. Add olive oil and oregano to tomatoes.  Mix well and spread on frese.

Note: You can substitute tomatoes with cherry tomatoes, 4 cherry tomatoes per each fresa. – Paola

Focaccia Dolce con Crema di Cioccolato (Sweet Focaccia Filled with Chocolate Cream)

23 Apr

Sweet focaccia : a childhood memory! Something that my mom used to prepare for me as an afternoon snack after school, something da leccarsi le dita (literally to lick your fingers, to make your mouth water)! It is popular in some Northern regions, made simply like a regular focaccia (see post http://passionandcooking.com/2013/01/29/focaccia/ ) but with sugar in the dough and sprinkled with sugar, raisins, honey or almonds.  It is even tastier if you fill it with chocolate cream, a rich and creamy spread made mainly of dark chocolate and roasted Piedmont hazelnuts. Piedmont is very famous for its hazelnuts that are used in many chocolate confections, including spreadable creams, the ultimate chocolate ecstasy. The chocolate spread is something favored by kids but it also ranks high amongst adults as comfort food. It is delicious on toasts, crackers and bananas. Have you ever tried an Italian-American banana sandwich? Take two slices of banana and top one with chocolate cream and the other with peanut butter; put them together and pop the whole thing into your mouth. It’s something to die for!!!!

FOCACCIA DOLCE CON CREMA DI CIOCCOLATO (SWEET FOCACCIA FILLED WITH CHOCOLATE CREAM)
Preparation time: 2 ½ hours           Baking time: 15-20 minutes     Servings: 6-8

Focaccia con Nutella Fetta

INGREDIENTS
Basic recipe
500 g (3 cups) high-gluten flour (Manitoba)
250 ml water (1 cup + 5 tablespoons) + 100 ml (7 tablespoons) skimmed milk at 45°C, 110 °F
130 ml (9 tablespoons) olive oil (Extra Virgin)
5 g (1 teaspoon) salt
80 g (6 tablespoons) sugar
1 package (7 g ;1 heaping teaspoon) dried yeast or 1 cube (25 g; about 1 ounce) fresh yeast
Granulated sugar

Filling
Chocolate cream

DIRECTIONS
1. In a small pitcher mix water and milk. Stir in salt until dissolved, then add 40 ml (3 tablespoons) olive oil.  Mix well, then dissolve sugar in it.  Sugar is the so called “nourishment” for yeast 
2. Pour the liquid in a large glass bowl and combine with half of the flour.  Stir well until you have a smooth batter
3. Add yeast to the batter, stirring well.  Remember never add yeast directly to salt, because it  prevents the yeast from rising
4. Add the remaining flour to the batter.  Mix well until you have a smooth and even dough, but still a little bit sticky
5. Remove the dough from the bowl and turn it out onto a lightly floured surface; knead briefly for about 1-2 minutesDo not add too much flour otherwise the dough will get tough
6. Lightly oil (with about 3 tablespoons) a 25×35 cm (10×14 in.) baking sheet; place the dough in center of the pan and cover with a cotton towel.  Let rise in a warm, draft-free place (about 30°C, 86°F) for about 60-90 minutes until doubled in size
7. Preheat oven to 220 °C (425°F)
8. Pat the dough into the baking sheet, filling it completely.  Brush the dough with oil.  Let it rise for about 30 minutes at 30°C until increases its volume
9. Press some deep holes into the dough with your finger tips, covering the entire surface
10. Drizzle with about 3 tablespoons oil olive (cover all areas of the dough) and wet the top with some water, using a spray-bottle, to keep focaccia soft.  Sprinkle with some granulated sugar (2-3 tablespoons)
11. Bake for 15-20 minutes until golden
12. Remove from oven and cool on a grid. When it is cool fill it with the chocolate spread. I would recommend to fill only the piece you are going to eat. It is especially tasty if you eat it warm.

Note: The type of water is very important; the pH should be around 6.  I usually use bottled drinking water to avoid having too much chlorine in the dough. The rising temperature is critical too, therefore place the dough in a warm draft-free place and do not open the oven during baking.  Another important piece of information is to never mix salt and yeast directly, because salt inhibits the action of the yeast.  Focaccia can keep for about two days wrapped in plastic wrap without filling, but I suggest eating it fresh, just out of the oven, to fully enjoy its fragrance.  -Paola

Focaccia

29 Jan

Focaccia (pronunced foe-CA-cha) is a soft, flat oven-baked Italian bread, so popular that most people could very well have had their first taste of it in an Italian bakery or restaurant somewhere other than on Italian soil.  It is made of simple ingredients such as flour, yeast, water, olive oil and salt.  It is seasoned with olive oil and herbs and is often topped with different vegetables (tomatoes, onions, potatoes, eggplants, zucchini or whatever else you like), cheese or meat.  It’s something enjoyable any time of the day as an appetizer, a sandwich bread, with a meal instead of traditional bread, or even “come rompi digiuno” – as a snack (this is a common kids’ snack to take to school; they love it!!!).  Focaccia traces its origins to the ancient Roman pan focacious, a flat bread baked on the hearth.  In Latin, in fact, focus means hearth, a place for baking.  Nowadays focaccia is widely spread all over the country, and it seems that each region has its own focaccia recipe.  The most common and wide-spread ones are focaccia Ligure (from Ligury) and focaccia Pugliese (from the region of Puglia).  Focaccia Genovese from the city of Genoa is very simple, prepared with only salt and oil olive on top, but the flavorful and fruity olive oil from this region adds a unique taste to the bread dough and makes this ancient food one of the most appreciated snacks.  The Genovesi (people from Genoa) are very proud of their focaccia, and they even enjoy it for breakfast soaked in cappuccino or latte macchiato.  Not too far away, focaccia di Recco (near Genoa) is richer version with a cheese filling between two thin layers of dough, making it a nice choice for a light lunch.  Focaccia Pugliese is usually prepared with vegetables on top such as fresh tomatoes and olives, finely sliced potatoes or other vegetables such as onions.  You might have also tried Focaccia dolce (sweet focaccia), popular in some Northern regions, made simply from regular sweet focaccia dough sprinkled with sugar, raisins, honey and almonds. 

Preparation time: 2 ½ hours                                  Baking time: 15 minutes                Servings: 6-8 

Focaccia con olive 1 small

INGREDIENTS
Basic recipe
500 g (3 cups) high-gluten flour (Manitoba)
350 ml water (1 cups + 5 tablespoons) at 45°C, 110 °F
130 ml (9 tablespoons) olive oil (Extra Virgin)
10 g (2 teaspoons) salt
1 teaspoon sugar
1 package (7 g ;1 heaping teaspoon) dried yeast or 1 cube (25 g; about 1 ounce) fresh yeast
Coarse salt

Topping
Focaccia with rosemary/oregano
The leaves only from 2 fresh rosemary sprigs or 2 tablespoon dried oregano

Focaccia with olives
150 g (1 cups) green olives

DIRECTIONS
1. In a small pitcher dissolve salt in warm water, then add 40 ml (3 tablespoons) olive oil.  Mix well then dissolve sugar in it.  Sugar is the so called “nourishment” for yeast  
2. Pour the liquid in a large glass bowl and combine with half of the flour.  Stir well until you have a smooth batter
3. Add yeast to the batter stirring well.  Remember never add yeast directly to salt because it will prevent the yeast from rising
4. Add the remaining flour to the batter.  Mix well until you have a smooth and even dough, but still a little bit sticky
5. Remove the dough from the bowl and turn it out onto a lightly floured surface; knead briefly for about 1-2 minutesDo not add too much flour otherwise the dough will get tough
6. Lightly oil (with about 3 tablespoons) a 25×35 cm (10×14 in.) baking sheet; place the dough in center of the pan and cover with a cotton towel.  Let rise in a warm, draft-free place (about 30°C, 86°F) for about 60-90 minutes until doubled in size
7. Preheat oven to 220 °C (425°F)
8. Pat the dough into the baking sheet, filling it completely.  Brush the dough with oil and sprinkle with some coarse salt.  Let it rise for about 30 minutes at 30°C until increases its volume
9. Press some deep holes into the dough with your finger tips, covering the entire surface
10. Drizzle with about 3 tablespoons oil olive (cover all areas of the dough) and wet the top with some water, using a spray-bottle, to keep focaccia soft.  Add your favorite topping
11.Bake for 15-20 minutes
12. Remove from oven and cool on a grid.

Note: You can add two tablespoons of semolina to the flour, this will makes the crust crunchier. The type of water is very important; the pH should be around 6.  I usually use bottled drinking water to avoid having too much chlorine in the dough. The rising temperature is critical too, therefore place the dough in a warm draft-free place and do not open the oven during baking.  Another important information is to never mix salt and yeast directly, because salt inhibits the action of the yeast.  Focaccia can keep for about two days wrapped in plastic wrap, but I suggest eating it fresh, just out of the oven, to fully enjoy its fragrance.  -Paola

Pane con Pancetta e Formaggio (Bacon and Cheese Bread)

7 Oct

This delicious bread, soft and tasty, and flavored with bacon and cheese, originates from the regions of Tuscany and Umbria in central Italy.  The bread is simple and quick to prepare and is a suitable recipe to accompany a cocktail, a salad, or a picnic.

PANE CON PANCETTA E FORMAGGIO (BACON AND CHEESE BREAD)
Preparation time: 55 min.               Baking time: 50 min.

Pane con Pancetta e Formaggio 

INGREDIENTS
3 large eggs
370 g  (2 ¼ cups) all-purpose flour
15 g (3 teaspoons) baking powder
150 g (about 1 cup) diced Swiss cheese (Emmenthal)
150 g (1 ½ cups) grated Parmesan cheese
80 g (½ cup) diced bacon
60 ml olive oil (Extra Virgin)
150 ml milk

DIRECTIONS
Preheat the oven to 170°C (350°F)
1. Mix the flour, baking powder and grated Parmesan cheese in a medium bowl
2. Add the eggs, olive oil and milk, mix until well blended
3. Add the Swiss cheese and the bacon
4. Stir well until the dough is smooth (you can add extra milk)
5. Pour the dough in a greased and floured bread pan (34 cm x 10 cm)
7. Bake for 50 min.

Let the bread cool in the pan for 5 min. on a rack, then remove it from the pan and let it cool on the rack or about 15 more minutes.  

My son can hardly wait for this bread to cool before cutting into it.  It’s excellent served at room temperature, but he says that it tastes best just out of the oven!  -Paola